Showing posts with label gimp. Show all posts

Gimp 2.8 Final Released

May 04, 2012
Gimp 2.8 has been officially released. It includes over 35 new features that is sure to make even the hard core Gimp critic try it out.

To get the full details of what is new, head over to Gimp Users website for a detailed tutorial giving insights into what Gimp 2.8 has to offer.

If you want to try out Gimp 2.8, you will either have to wait for the next iteration of the Linux distribution you use, or download the Gimp source/binary from the Gimp website and compile/install it yourself.

Fedora 17 beta includes Gimp 2.8 in its repository. So you can also download a live CD of Fedora 17 beta to try out Gimp 2.8.


Gimp 2.8 Review

April 20, 2012
I had recently written about the anticipated release of Gimp 2.8 which brings revolutionary changes to the Gimp user interface and lots more under the hood. However, as of now, if you want to download and try Gimp 2.8 you have to do one of the two things, namely -

GIMP 2.8 RC1 Released - Packs Powerful Features

April 12, 2012
GIMP project has released GIMP 2.8 RC1 - a precursor to the upcoming GIMP 2.8.

GIMP 2.8 RC1 (Release Candidate) gives you a taste of the new features that are being offered in GIMP, which includes -

GIMP 2.7.4 Released As a Precursor To Stable 2.8

December 15, 2011
A new version of GIMP - the free graphics suite par excellence - has been released. GIMP ver 2.7.4 , which is termed as an unstable release leading to a stable version 2.8 sometime in January next year, brings a lot of new features.

Resynthesizer GIMP Plugin - Selectively Remove Objects from Pictures

May 13, 2010
Resynthesizer is a GIMP plugin for texture synthesis. You can use it to seamlessly remove objects from images, create more of a texture, and create themed images. This tutorial explains how you can install and use the GIMP resynthesizer plugin to selectively remove objects from your images.

Handy Tips To Be More Productive Using GIMP

September 30, 2009
GIMP logo
GIMP - also known as the GNU Image Manipulation Program - is well known as an excellent graphics editor. Many people even consider it as useful as Adobe Photoshop for creating images for the web. I have been using GIMP for a long time now and have used it for such tasks as screen capturing, optimizing images, retouching photos, scaling images, special effects and so on. GIMP is available for multiple platforms including Windows, Linux, and Mac OS X. Why, GIMP is even available as a portable application  which allows you to run it directly from a USB pen drive.

The following are a few handy tips which will help you be more productive in GIMP.

GIMP 2.7.0 has been released

August 17, 2009
GIMP version 2.7.0 has been released. GIMP 2.7 is the first step towards GIMP 2.8 which will be a stable release. GIMP follows the Linux kernel approach to version numbering in that all odd numbered versions are unstable and even numbered versions are considered stable.

Some of the notable features in GIMP 2.7.0 are as follows :
  1. Text editing with text tool is done in the canvas like you do in Adobe Photoshop and not in a separate window.

GIMP 2.4 finally released

October 25, 2007 2 comments
It has been quite some time (somewhere around 2 or 3 years) since the last release of GIMP which was version 2.2. But the GIMP team has finally made it across the finishing line by releasing yet another stable version of GIMP namely ver 2.4.

But even though GIMP 2.4 has been officially released only now, if you are using the latest version of any of the major Linux distributions, then chances are you already have a release candidate of GIMP 2.4 installed on your machine.

The most visible features in GIMP 2.4 for me are the following :
  • Rectangle and Ellipsoidal selections can be resized.
  • Foreground selection tool - Select a region containing foreground objects.
  • Healing tool - Heal image irregularities.
  • Perspective clone tool - Clone from an image source after applying a perspective transformation.
  • Alignment tool - Align and arrange objects and layers.
Then via the menu, you now have access to a red eye removal plug-in. This is a very useful addition for the simple reason that many photos snapped by amateurs like us often display the red eye phenomenon and now it can be corrected in GIMP with a simple mouse click. Earlier this required several steps.

Fig: GIMP 2.4 toolbox

The screenshot plug-in now features more sophisticated options. Now there is an option to grab a region rather than just the whole screen or a particular window.

These are the new features that I noticed when I used GIMP 2.4 but there are a slew of less visible but equally useful features that are incorporated in the new version which is listed in the release notes at GIMP website.

Overall, I am very pleased with GIMP 2.4 and even though there are a lot of features yet to be added to bring it at par with Adobe Photoshop, this is a big step in the right direction.

Liquid Rescale GIMP Plugin

September 29, 2007 11 comments
Liquid rescale is a GIMP plugin that intelligently resizes an image without losing those parts that are important.

It uses a technology called image re-targeting - algorithmically determine which areas of the image are important and then delete other areas retaining those which are important.

Liquid rescale GIMP plugin is available for Windows, Linux, and Mac OS X. However it is not included in the default set of plugins shipped with GIMP. So to start using the Liquid rescale plugin, you have to first install it separately.

Liquid rescale plugin can be installed in most Linux distributions using their respective package management tools.


If you are using Fedora Linux, you can install the Liquid rescale plugin using Yum as follows.

$ su -c 'yum install gimp-lqr-plugin'

After you have installed the plugin, you can access it via GIMP menu - Layer > "Liquid rescale..." as shown in the image below.

Liquid rescale GIMP plugin menu

Liquid rescale plugin

For further details on how to use the plugin, please visit the Liquid Rescale Plugin home page.

Gimp UI brainstorm - Ideas to help make Gimp better

September 20, 2007 3 comments
Gimp is one of the finest graphics suites which is released under a GNU license. I dare say, feature wise, Gimp rivals even Adobe's Photoshop in creating and manipulating images targeted for the web. Before you jump the gun, I did say images for the web.

One of Gimp's weakness is its poor support for CMYK (Cyan, Magenta, Yellow and Black) color profiles which is the dominant profiles used in the printing industry (read offset printing) . So if you are creating images to be published on a glossy magazine or a flier, then you will do better to stick to Photoshop for now. Again another off repeated complaint that most first time users of Gimp have is its seemingly kludgey interface.

Personally, I have no problem with it as I have grown comfortable with the current Gimp GUI but I guess it could be further polished and made more efficient. So there has been a move by the GIMP UI redesign team to highlight the possible ways in which the Gimp UI could be spruced up and made more user efficient. And the result is the Gimp GUI brainstorm blog.

This blog highlights mock ups of GIMP UI interface which is contributed by the general public. If you have an interesting idea, then you can create a mock up and submit it to the blog and it will be published for all to see.

The rules for submission are as follows :
  • Explain your idea in an image or two. Only these images will be published, so make sure any needed explanation is inside them. Images must be in jpg, gif, bmp or png format, maximum 8MB each.
  • Your images should show your idea in a clear way, but they don’t have to be glossy and polished. Plain vector drawings or even scanned pencil sketches should also work.
  • Send your image to gimp [dot] brainstorm [at] gmail [dot] com , with the word ‘GIMP’ in the subject line of your email.
Apart from the blog, the GIMP developers have been busy and have published a set of User Scenarios which will be used in the GIMP redesign project.

Here are a sample of the mock ups which have been submitted by Gimp lovers.

Fig: Red Eye tool - Sorry! Gimp already has one. You can find it in the menu.

Fig: I like this idea...


Fig: Cool eyecandy :-)

Image Retargeting - A new technology to display images on the web

August 27, 2007 1 comments
Displaying images on the web is always a case of walking the fine line between optimizing the image for the web and making sure the image doesn't lose its clarity or its intended purpose. There are two ways of resizing an image which is popularly used by web masters and lay persons alike. They are cropping an image and scaling an image to the desired size. The former method will most possibly end with the image losing its fine details where as using the latter method will reduce the image's clarity.

Now it seems a new method of resizing an image has been demonstrated by two Israeli professors, Shai Avidan and Ariel Shamir which ensures that the image retains both its functionality as well as its clarity. This method is called re-targeting. The idea is to algorithmically determine which areas of the image are important and then delete other areas retaining those which are important.

Retargeted Image
Re-targeted vs cropped vs scaled image.

At present none of the graphics suites including Photoshop and Gimp provide tools to re-target an image. Perhaps if this new algorithm (or method) is released under an open license, we could see this functionality being incorporated in Gimp in the future. It is popularly known as 'Seam Carving for Content-Aware Image Resizing'.

For now watch this Youtube video which explains this interesting process in more detail.

Gimp - The graphics suite par excellence on Linux

November 03, 2005 10 comments
Gimp is a GPLed cross platform graphics suite which rivals many commercial graphics packages available in the market. I have been using Gimp for all my graphics needs for the past two years. And believe me, this is a winner not only in terms of price (which it is) but also in quality and features. You can do everything and almost anything using Gimp that you can achieve in Adobe's Photoshop. All the screenshots and images used on this site have been created or modified using Gimp.

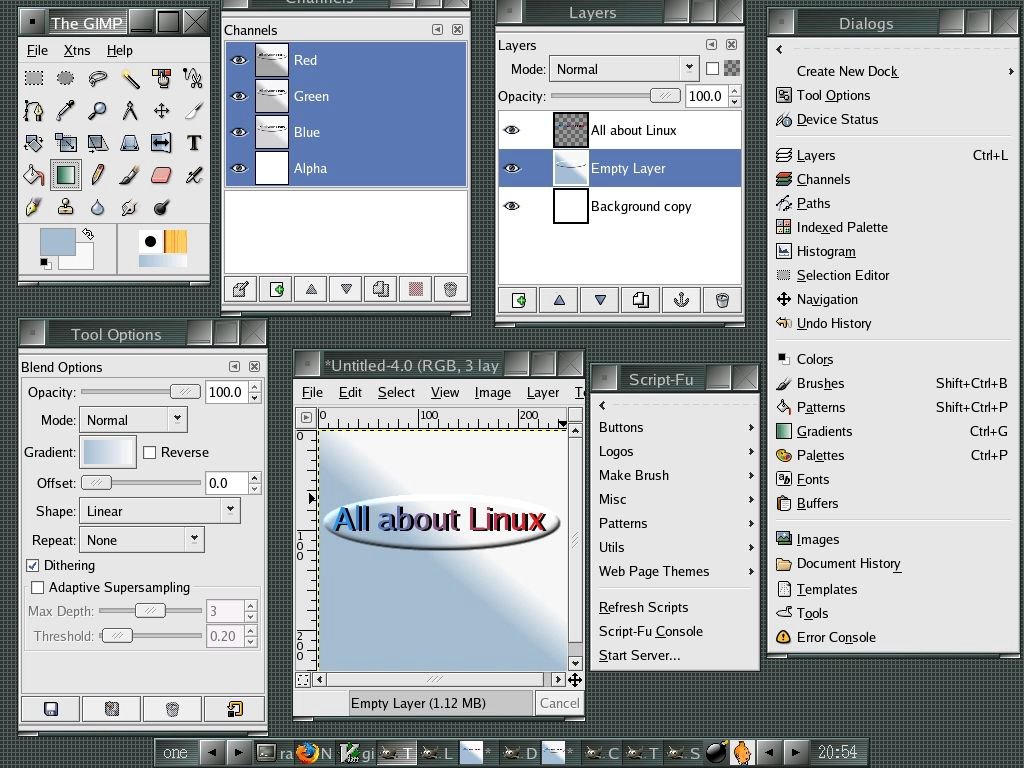
Fig: Main interface of Gimp

Gimp is an ideal tool for optimizing the images meant to be hosted on the web. The most endearing aspect of Gimp for me is the plethora of scripts and plugins that are installed with it. Gimp uses a scripting language called Script-fu which can be used to create beautiful banners and buttons meant for use on websites.
You should not mistake a script with a plugin. A plugin requires a image to work on, where as a script will create an image from scratch. There are over a hundred plugins and script-fu's available for gimp. Want to create a ripple effect on your image? No problem! you can create it with the click of a button. The area where Gimp outshines Photoshop is in creating images optimized for the web.
As a first time user, you will find the user interface of Gimp a bit clumsy because each function has its own window unlike Photoshop which has a single main window which encloses all the features. But after working in gimp for some time, you will realize that it is really a great advantage to have multiple independent windows. Let me elaborate on what I just said. Usually, you will be doing graphics manipulation using a monitor having atleast 1024x768 or higher resolution. In this resolution, you can neatly arrange the multiple windows in gimp in such a way that they don't overlap each other (See Fig below). This makes working in gimp easier and enjoyable. Gimp is available for multiple platforms (Windows, Linux, Unices ).

Fig: Gimp windows arranged for efficient use.

Fig: You get a good set of brushes in Gimp

Some of the powerful features in Gimp are as follows:
  1. Support for creation of Layers, Channels and Paths.
  2. Excellent collection of plugins and scripts (Script-Fu)
  3. Creating Alfa channels and Layer Masks.
  4. Good set of tools equivalent to those found in Photoshop like crop tool, gradient tool, Magic wand, Clone tool, paint brush and so on which will make a Photoshop user feel right at home.
  5. Save images in over 34 formats including in Photoshop file formats, not to mention TIFF, GIF, JPEG, PNG and Postscript.
  6. Gimp maintains a history of your actions which helps you to go back to any previous point if you have made a mistake.
  7. Can easily automate a function by writing your own scripts to do a particular task using script-fu.
Shortcomings of Gimp
  • One of the biggest short comings of Gimp is lack of good CMYK support.
    For those in the dark, CMYK (Cyan, Magenta, Yellow and Black) refers to the color of inks used in the printing process. So if you are readying a graphics (maybe a brochure) to be send to your neighborhood commercial printers, then you have to convert it to CMYK mode before sending it to them. CMYK support is very important for any graphics package to make it big in this profession. And Photoshop is where it is because it has better CMYK support. But that is bound to change as Gimp developers have promised better CMYK support in the next major release of Gimp.

Fig: Gimp has an Inbuilt Unit Editor

Fig: A well designed 'preferences' dialog

Fig: Create special effects on images with ease

Bottom Line
  • Home users need not look at any other software when Gimp is around. You get all the power that you need - be it photo retouching, red-eye removal, creating borders for your photos and more - in Gimp.
  • If you are a web developer creating images to be used on a website or to be viewed on a PC, you will be working in RGB (Red,Green,Blue) mode. I strongly recommend using Gimp as your graphics software.
  • But if you create graphics meant for printing, then it is better you stick to Photoshop for the time being because of poor support for CMYK mode in Gimp.