Showing posts with label network administration. Show all posts

Nmap explained from an Ethical Hacker's View

September 04, 2007 3 comments
Nmap (Network MAPper) is a network scanner written by Gordon Lyon. It is a free and open source tool and is available at insecure.org with versions for Windows and Linux and is ubiquitous in its use.

Nmap can be (and is) used to for instance, scan for open ports on a remote server, to detect the OS run on the server, what all services are running on the remote server and so on.

Many of us might have run the TCP SYN scan which require root privileges and the TCP connect scan which can be run even as an ordinary user. But there is much more to the usage of nmap tool.

Kirby Tucker at ethical hacker has written a very informative article which provides inside knowledge about the usage of nmap as well as what each command accomplishes.

In part I of this tutorial, he explains no less than 13 different scans you can run using the nmap tool. And at the end he also demonstrates how you can glean information by running nmap in conjunction with wireshark (an open source network protocol analyzer). A really interesting read for all aspiring system administrators.

Update (September 06 2007): It seems the publishers of the article have run into some copyright problems and have temporarily taken the resource down till the problems could be ironed out.

In the meantime, a comprehensive resource on nmap which you will find really helpful is the book titled - "Secrets of Network Cartography: A Comprehensive Guide to nmap" authored by James Messer which you can freely read online. You can even download a PDF version of the book for a nominal price.

Building a Personal Firewall in FreeBSD using FirewallBuilder

August 06, 2006 0 comments
Whether it be a production grade server or a home computer, as long as it is connected to the outside world, running a firewall is unavoidable. GNU/Linux comes with its own firewall called iptables (netfilter). And there are a number of front-ends available such as Firestarter which make maintaining a firewall childs play especially on the desktop. In the past, I have published articles explaining how to setup a firewall in GNU/Linux.

Dru Lavigne, an instructor and FreeBSD advocate has written an excellent tutorial explaining how to setup and use Firewall Builder - an object oriented GUI and a collection of policy compilers for various firewalls including pf (packet filter) the firewall used in FreeBSD. The tutorial takes the readers through setting up (installing) firewall builder software in FreeBSD to creating a firewall ruleset to controlling the firewall and lastly fine tuning the rules.

A step-by-step guide to running your own Unix Web Server

May 13, 2006 0 comments
What does it take to convert ones computer to work as a web server ? You need a stable and secure network operating system, a web server software, a database which scales well and your choice of scripting language.

The interesting thing is that it is quite easy to convert a computer to work as a web server using only free technologies. We have a plethora of free OSes like Linux, FreeBSD and Open Solaris which are a robust and secure alternative to the proprietary ones, a very popular web server software in Apache and a robust free database in MySQL. I need not tell that PHP is one of the most used dynamic scripting language on the web and is the preferred choice for building most websites. So is that all that is needed to set up a web server? Not quite... You also need to have the expertise in configuring the various parameters of the above mentioned software.

In a previous article, I had explained how to serve webpages from ones machine using Apache web server.

Dave Tufts has written a three part series on setting up ones machine as a web server. He has used FreeBSD as his choice of OS and Apache, MySQL and PHP as the web server, database and scripting language respectively. In the first part of the article, he lists the steps needed to install FreeBSD on ones machine which includes the ideal partitioning scheme for this purpose. In the next part, he takes the readers through installing Apache, MySQL and PHP and interestingly he does it by compiling from source. And in the last part, he plows into configuring apache webserver.

Server monitoring with munin and monit

May 08, 2006 1 comments
When running a production server, whether it is under heavy load or otherwise, it is very much desirable to keep track of the various physical aspects of the server like the CPU load, memory usage by the services, whether the required services are running, the network traffic and so on. As well as make sure that all the necessary services are running even when under heavy load and do not die on you.

The Linux server administrators have a perfect combination of tools in Munin and Monit to accomplish the above said situations. Munin surveys the computer and presents all the information in graphs through a web interface. And it is Monit's job to keep track of the processes and restart them if they do not respond or even completely stop a process if it is under heavy load which it cannot bear. You can use monit to monitor files, directories and devices for changes, such as timestamp changes, checksum changes or size changes. You can also monitor remote hosts; monit can ping a remote host and can check TCP/IP port connections and server protocols. These two tools are developed and maintained by different people but in conjunction with each other, they present a powerful medium for system administrators to monitor and manage the services running on Linux/Unix servers in an optimal manner.

Falko Timme has jotted down his experiences in installing and configuring these two nifty tools (munin and monit) on his server to monitor his server statistics and control the running processes which gives a sound understanding of the use of these two rather powerful tools.

Password protect your website hosted on Apache web server

February 24, 2006 17 comments
At times, when I am browsing the web, I click on a link such as this one and instead of a web page, I get a dialog box asking me to enter my user name and password. And only after I have been authenticated do I get access to the website (or page). This feature of password protection is very simple to implement in Apache web server.

Basically, the whole process of password authentication banks on just two files . Them being :
  1. .htpasswd - This file contains the user name - password combination of the users who are allowed access to the website or page. This file can reside anywhere other than the directory (or path) of your website. But usually, it is created in the Apache web server directory (/etc/apache2/.htpasswd). This is because, this file should not be accessible to the visitors to the site.
  2. .htaccess - This file defines the actual rules based on which users are given access or denied access to a particular section or whole of the website. This file should reside in the base directory of one's website. For example, if my website is located in the path '/var/www/mysite.com' and I want to provide user authentication to the entire website, then I will store the file .htaccess in the following location - '/var/www/mysite.com/.htaccess '.
If one is implementing this feature for the first time on one's server, then he has to create the .htpasswd file. I chose to create the .htpasswd file in the apache 2 configuration directory. After this, one can add any number of users and assign passwords to them. This is done by the htpasswd utility which gets installed with the apache2 web server.
# htpasswd -c /etc/apache2/.htpasswd ravi
New password: *****
Re-type new password: *****
Adding password for user ravi
#_
In the above command, -c option asks the htpasswd utility to first create a .htpasswd file in the /etc/apache2 directory. Simultaneously, I have provided the name of the user (myself) and the utility asks me to type a password which is used to authenticate me before allowing access to the site.

Note: Any number of users and their password may be entered in the same .htpasswd file per website.

Now I make this .htpasswd file readable by all the users as follows:
# chmod 644 /etc/apache2/.htpasswd
Next step is the creation of the file .htaccess which will prohibit the full or a part of the website which is situated in /var/www/mysite.com. Since I am interested in password protecting the whole website, I create the file in the /var/www/mysite.com base directory. But if I am interested in protecting only a sub-directory (say by name 'personal') of this site, then I will have to create it in the '/var/www/mysite.com/personal' directory.
# touch /var/www/mysite.com/.htaccess
Now I enter the following lines in the .htaccess file :
AuthUserFile  /etc/apache2/.htpasswd
AuthGroupFile /dev/null
AuthName MySiteWeb
AuthType Basic
require user ravi
Here 'AuthUserFile' points to the place where I have stored the .htpasswd flat file which contains the user names and passwords.
AuthGroupFile points to the group file which contains the group of users. Here I have opted to not have a group file and hence points it to /dev/null .
AuthName directive sets the name of the authorization realm for this directory. This name can contain spaces.This is a name given to users so they know which username and password to send.
AuthType value of Basic instructs apache to accept basic unencrypted passwords from the remote user's web browser.
The last line - require user ravi - tells apache that only the user with name 'ravi' should be allowed access provided the right password is entered. If more than one user is to be allowed access, then those user names could also be appended to the line. Suppose I want another user also to access the file, I modify the line as follows:
require user ravi john
And if I want all the users listed in the .htpasswd file to be allowed access, the line is modified as thus:
require valid-user
The .htaccess file also has to be provided the right file permissions.
# chmod 644 /var/www/mysite.com/.htaccess
One more step is needed; that is to change a line in the apache2 configuration file. In a previous article titled "Host websites on your local machine using Apache websever", I had dwelled upon the modular structure of the Apache 2 configuration files.

Following that structure, assuming my configuration file for the website /var/www/mysite.com is stored in /etc/apache2/sites-available/mysite.com , I open the file in an editor and change the following line :
<Directory /var/www/mysite.com/>
...
AllowOverride None
...
</Directory>
TO
<Directory /var/www/mysite.com/>
...
AllowOverride AuthConfig
...
</Directory>
... and save and exit the file. Now restart apache web server to re-read the configuration file.

Note: If you are using apache instead of apache2, then the file to be edited is /etc/httpd/conf/httpd.conf though the lines to be edited are the same.

That is it. From now on any user who visits the website will first have to enter the correct username and password before he is allowed access to the website.

Host websites on your local machine using Apache websever

February 15, 2006 15 comments
Apache is a popular web server which has grabbed a major slice of the web server market. What is interesting about Apache is its stability and scalability which makes it possible to serve even very high traffic web sites without any hitch. It also helps that it comes with an unbeatable price (free). It is bundled by default with most Linux distributions. And in cases where it is not included in the CD, it is a simple case of downloading the package and installing it.

Here I will explain how one can set up Apache web server to serve ones web pages from your machine.

Packages to be installed
apache2 , apache2-common , apache2-mpm-prefork
And optionally ...
apache2-utils , php4 (If you need PHP support) , php4-common

Apache2 has a very modular structure. In fact if you see the directory structure of the configuration files (see figure below), you will realise that it is designed to avoid clutter. For serving web pages on our machine, we need be concerned with just two directories - them being, /etc/apache2/sites-available/ and /etc/apache2/sites-enabled/ .

Fig: Apache2 directory structure

In the sites-available directory you create the files (can be any name) containing the configuration details of the sites you aim to host - one file per site. And in the sites-enabled directory, you create a soft link to the previously created file.

Configuration details
Let us assume for the sake of this tutorial that I have decided to host two websites on my local machine. All the files related to the two websites have already been created and saved in two separate directories by name websiteA and websiteB . The default location for serving the files in apache is usually in the /var/www location. So I move the two directories websiteA and websiteB to this location.
$ sudo cp -R -p websiteA /var/www/.
$ sudo cp -R -p websiteB /var/www/.
The -p option preserves the ownership of the files and directories while copying.

Next I move into the directory /etc/apache2/sites-available in order to configure apache web server to recognize my sites. In this directory, there is a file called default which contains the configuration parameters. It is meant to be a skeleton file which can be used as a base for additional configuration.

I made two copies of this file in the same directory and renamed them as websiteA and websiteB. You can give any name really but for clarity it is prudent to give them the name of your site.

Now I opened up the file /etc/apache2/sites-available/websiteA in my favourite editor (vi) and made changes to the following portions (shown in bold):
#FILE: /etc/apache2/sites-available/websiteA
NameVirtualHost websiteA:80

<virtualhost websiteA:80>
ServerAdmin ravi@localhost
ServerName websiteA
DocumentRoot /var/www/websiteA/
<directory>
Options FollowSymLinks
AllowOverride None
</directory>
<directory /var/www/websiteA/>
Options Indexes FollowSymLinks MultiViews
AllowOverride None
Order allow,deny
allow from all
...
</directory>
...
...
</virtualhost>
In the above listing, ServerName indicates the name (or alias) with which your site has to be recognised. Usually a webserver will be hosting multiple sites with different domain names on the same machine. At such times, the webserver distinguishes between different websites through the ServerName directive. Since this is a local machine, I have given it the name websiteA. But in actual hosting where you want to make the website available on the net, you will be giving it your domain name say like www.mysite.com or something.
The DocumentRoot option denotes which files to be served when the server name is entered in the web browser. This usually points to the place where you have stored your website files.
You can have multiple Directory tags but one of them should point to the location of the website files.
I made similar changes to the file websiteB where the ServerName was given a unique name websiteB instead of websiteA as given above. Also the Directory tag contained the path /var/www/websiteB/ instead of websiteA.

Finally, because I was hosting this on my local machine and since I had not configured DNS, I had to edit the /etc/hosts file and include the name given in the ServerName portion of the configuration file. After the inclusion, my machine's /etc/hosts file looked as follows:
#FILE : /etc/hosts
127.0.0.1 localhost.localdomain localhost websiteA websiteB
That was it. Now in order to enable the websites, all I had to do was create a symbolic link to these files in the /etc/apache2/sites-enabled/ directory and restart the web server. It is quite clear that to disable a website, all you need to do is remove the symlink in the sites-enabled directory.
$ cd /etc/apache2/sites-enabled
$ sudo ln -s /etc/apache2/sites-available/websiteA .
$ sudo ln -s /etc/apache2/sites-available/websiteB .
Restart the apache web server
$ sudo apache2ctl restart
OR
$ sudo /etc/init.d/apache2 restart
Now I tested it by opening up the web browser and typing http://websiteA to get the first website and http://websiteB to get the second website. Voila! Success!!.

Note: In previous versions of Apache, all these configuration parameters were inserted in the /etc/httpd/httpd.conf file. But I feel, apache2's configuration file layout is much more intutive and easier to manage.

Excellent set of Video tutorials on DNS , Network monitoring and Web server configuration

December 18, 2005 1 comments
Are you looking forward to setting up an intranet in your office or home network? Then you will benefit by setting up DNS on your server. DNS stands for Domain Name System and is used to resolve names to IP address and vice versa. For example, when you type the name www.google.com, it is the DNS server's job to translate this name to the IP address of the google server.

On this note, Jake Paulus has put together an excellent set of videos which hand holds a person through the whole setup and configuration process. The video tutorials can be either downloaded or viewed online as a flash presentation. He has also created video tutorials for configuring a web server (apache + mysql + php) as well as a Linux network monitor ntop.

I strongly recommend anybody interested in these Linux topics to view the videos.

Related Posts:
Understanding DNS
Implementing DNS on Linux Part I , Part II , Part III

Routing , NAT and Gateways in Linux

September 18, 2005 0 comments
This article explains the concept of a router, NAT, and a gateway and how to configure these in Linux.

Apache : Name-based Vs IP Based Virtual Hosting

September 10, 2005 1 comments
Often when, you attend interviews for network administration related jobs , the one question you may encounter while discussing about web servers is the difference between name-based and IP based virtual hosting. Here I will explain the difference between the two.

In IP-based virtual hosting, you are running more than one web site on the same server machine, but each web site has its own IP address. In order to do this, you have to first tell your operating system about the multiple IP addresses. See my post on configuring multiple IP addresses on a single NIC . You also need to put each IP in your DNS, so that it will resolve to the names that you want to give those addresses .

In Name-based virtual hosting, you host multiple websites on the same IP address. But for this to succeed, you have to put more than one DNS record for your IP address in the DNS database. This is done using CNAME tag in BIND. You can have as many CNAME(s) as you like pointing to a particular machine. Of course, you also have to uncomment the NameVirtualHost section in httpd.conf file and point it to the IP address of your machine.

#FILE: httpd.conf
...
NameVirtualHost 192.168.0.1
...

This excellent article on Serverwatch.com explains in detail the configuration details of both types of virtual hosting in apache webserver.

Implementing DNS on Linux - Part III

September 07, 2005 1 comments
This is the third and final part of my post on DNS. You can read the part I and part II of this post if you haven't done yet and then come back to this post.
Check BIND Syntax with these utilities
If there is a syntax error in the files /etc/named.conf or /var/named/* files, then the BIND server will fail to start. There are two utilities that come along with BIND which helps one to check for syntax errors in the files. They are :
  • named-checkconf - This script checks the /etc/named.conf file for any syntax errors.
  • named-checkzone - This file checks for any syntax errors in a specific zone configuration.
# named-checkzone mysite.com /var/named/mysite.com.zone

BIND Utilities
Many useful utilities are included in the bind-utils RPM package. Some of these are as follows:
host - This is a utility used to gather host/domain information. It is capable of showing all the information about a host and / or listing an entire domain.

# host -a www.mysite.com


... lists all information about www.mysite.com

# host -al mysite.com


... shows all information for every host in the mysite.com domain. Listing an entire domain's contents is known as performing a "total zone transfer".

dig - Short form for domain information gropher is a utility used to send queries directly to the name server, bypassing any system resolver libraries. This direct access is useful for problem isolation. The output of dig is in zone file format.
Some examples using dig are as follows:

$ dig @ns mysite.com
$ dig mail.mysite.com
$ dig -x 192.168.0.254
$ dig www.yahoo.com


Note: Dig expects to be given FQDNs for lookups, while host utility will look at the search information in /etc/resolv.conf file.

Additional help on configuring BIND
If you have installed BIND software on your machine, you can find additional docs on BIND at these locations :
BIND features - /usr/share/doc/bind-version/README
Migration to BIND from other DNS servers - /usr/share/doc/bind-version/misc/migration
BIND ver 9 administration manual - /usr/share/doc/bind-version/arm/Bv9ARM.html
Also visit the BIND home page.

Implementing DNS on Linux - Part II

September 06, 2005 2 comments
In my previous post, Implementing DNS on Linux - Part I, I explained the syntax of /etc/named.conf file. In this post, I will explain the rest of the steps needed to implement DNS in Linux using BIND.

Zone Files
Zone files reside in the /var/named/ directory. These files are those named in the /etc/named.conf file with the 'file' directive.

For example, in Part -I of this post, I had created a zone called mysite.com which had a file directive by name "mysite.com.zone". So I move to /var/named/ directory and create a file by the same name here.

# touch mysite.com.zone

Similarly for each zone you have created in /etc/named.conf file, you should have a corresponding file by the same name as that given in the file directive in the /var/named/ directory.

Syntax of Zone File
  • Begins with $TTL (Time To Live). This determines the default length of time in seconds which you want resolving servers to cache your zone's data.
  • First resource record is zone's Start Of Authority (SOA).
  • Zone data in additional resource records.
  • Fully qualified domain names (FQDN) in zone file must end with a dot (.) .
    BIND assume that the names that don't end with a dot should end with the name of the current domain. Always use a dot at the end of a name that is fully qualified.
  • Semi colons ; in database files signify a comment to the end of line.
Example :

; FILE : mysite.com.zone
$TTL 86400 ; Time to Live in Seconds

@ IN SOA ns.mysite.com. root.mysite.com. (
20011042501 ; Serial Number.
300 ; refresh.
60 ; retry
1209600 ; expire
43200 ; minimum TTL for negative answers.
)
...


The @ is interpreted as the name of the originating domain - mysite.com in the above example. The @ itself is not mandatory, but the domain must be indicated. The values of fields between the brackets, except for the first, are time periods.

Serial numbers - Are based on ISO dates. Every time the data in the database is changed, the serial number must be increased in order that the slave servers know the zone has changed.

Refresh - Is the delay time that slave name servers should wait between checking the master name server's serial number for changes. A good value is one hour.

Retry - is the delay time that a slave name server should wait to refresh its database after a refresh has failed. One minute is a good value.

Expire - is the upper time limit that a slave name server should use in serving DNS information for lack of a refresh from the master name server. A good value is 7 days.

The minimum time to live for negative answers specifies how long a nameserver should cache a "no such host" response from an authoritative server of the domain. This reduces load on the server.

Note that all times are in seconds by default. However, the following may be used :
W = Weeks
D = Days
H = Hours
M = Minutes

Must use capital letters, no space between the number and the unit is allowed.

The last string in the first line of the SOA record (root.mysite.com. in the above example) specifies the contact person for the domain. Conventionally, the responsible party's email address is used, replacing the @ with a dot.
Types of Records in a Zone File
Name Server NS
There should be an NS record for each master or slave name server serving your zone. NS records point to any slave servers that should be consulted by the client's name server if the master should fail.

; FILE : mysite.com.zone
...
@ IN NS ns.mysite.com.
mysite.com. IN NS ns1.mysite.com.
...

NS records designate name servers to use for this domain. It should contain at least one DNS server that is authoritative for the zone. A list of slave servers that can be referenced is commonly included. Fully qualified names must be used for NS resource records. The @ notation allows the domain name to be taken as the originating domain for the zone.

A record - An A resource record maps a hostname - which may or may not be fully qualified - and an IP address.

; FILE : mysite.com.zone
...
mail IN A 192.100.100.5
login.mysite.com. IN A 192.100.100.6
...

PTR - These are the inverse of A records - they map an IP address to a hostname. For reverse lookups - that is, PTR records - specify the octets of the domain in the reverse order. For example, if the zone was defined as 100.192.in-addr.arpa, then the name server would expand the PTR reference in the slide into 6.100.100.192.in-addr.arpa. A lookup of 192.100.100.6 would find this reference and would return login.mysite.com.

; FILE : mysite.com.zone
...
login.mysite.com. IN A 192.100.100.6
6.100 IN PTR login.mysite.com.
...

MX - These records are used to define mail handlers (or, exchangers) for a zone. MX records must have a positive integer listed immediately after the MX and before the host name. This integer is used by remote Mail Transport Agents (MTA) to determine which host has delivery priority for the zone.

; FILE : mysite.com.zone
...
mysite.com. IN MX 5 mail.mysite.com.
mysite.com. IN MX 10 mymail.mysite.com.
...

Precedence is given to the mail exchanger with the lowest priority. If that host is not up, then the next lowest priority mail exchanger will be used. If none of the mail exchangers are up, then the mail will be returned to the forwarding SMTP server to be queued for later delivery.

CNAME - These records map address aliases.

; FILE : mysite.com.zone
...
pop IN CNAME mail
ssh IN CNAME login.mysite.com.
...

Note: CNAME, A and PTR resource records comprise the bulk of resources seen in the database files. Incorrect setup of these records can cause many problems, so they should always be evaluated carefully before changes are committed.

Round-Robin load sharing through DNS
Load balancing can be achieved through the simple use of multiple A records.

; FILE : mysite.com.zone
...
www 0 IN A 192.168.1.10
www 0 IN A 192.168.1.11
www 0 IN A 192.168.1.12
...

Note: DNS traffic will increase because a TTL of 0 means queries will never be cached.

To be Contd...

Implementing DNS on Linux - Part I

September 05, 2005 0 comments
In the previous post - Understanding Domain Name System , I had explained about domain, zone and its features. Here I will explain how to implement DNS on linux.

Berkeley Internet Name Domain (BIND) is the most widely used DNS server on the internet. BIND provides a stable and reliable infrastructure on which to base a domain's name and IP address associations.
The current BIND is version 9. It has many features like providing IPv6 support, allowing 8-bit clean names and better multi-threading. BIND is maintained by Internet Software Consortium isc.org .

First step in successful implementation of BIND is to make sure that you have bind and bind-utils package installed on your system. If you are using RedHat, you can find it by executing the command(s):

# rpm -q bind
# rpm -q bind-utils

DNS Service Profile
Daemons : named , rndc
Ports : 53 (domain) and 953 (rndc)
Configuration files : /etc/named.conf , /var/named/* , /etc/rndc.*
GUI (Only in RedHat/Fedora) : system-config-bind

If you want to implement a caching name server then you should also install caching-nameserver package and for cryptographic support install openssl package.

Configuring BIND
The default configuration file is /etc/named.conf which is read by named (BIND daemon) during startup or service reload.

/etc/named.conf
  • Comments can be of C,C++ or Shell style.
  • The contents of the file is divided into blocks delineated by braces '{}' . Each block can contain sub-blocks within. Each block ends with a semi-colon.
  • Directives options, server and zone precede the blocks.
Options Directive
Commonly used global options

  • directory : Base directory of all relative paths specified in named.conf
  • forwarders : Server forwards queries it can't answer to the name servers at the IP address in the list. If it gets no answer, it will try a root name server unless the forward-only option is also set.
  • allow-query : Specifies an address match list of hosts allowed to query this server. If this option is not set, any host can query the server.
  • allow-transfer : Like allow-query, specifies hosts that may copy the database. Should be used to limit zone transfers. By default zone transfers are not permitted unless explicitly stated using the allow-transfer statement.
Eg:

#FILE : /etc/named.conf
...
acl "mynetwork" { 192.168.100/24; }; # Gives a name for the network
options {
directory "/var/named";
forwarders { 203.22.11.121; };
allow-query { mynetwork; };
allow-transfer { mynetwork; };
};
...

Address Match Lists - acl

Address match list is a list of semi-colon seperated IP addresses, networks, or named address match lists.
You can use acl to create a custom named address match list as shown in the above snippet.
Trailing non-significant zeros may be dropped. For example you can denote the network 192.168.5.0 as 192.168.5 .
acl makes the configuration easier to read and maintain.

For acls there are 4 pre defined named address match lists available. They are as follows :
  1. none : No IP address matches
  2. any : All IP address match.
  3. localhost : Any IP address of the name server matches.
  4. localnets : Any network on which the name server has an IP address matches.
For example, to create an acl which matches only the server, we write it as follows:

acl "mylocalmachine" { localhost; };

One of the main benefits of ACLs is that they make the configuration file easier to maintain and more human readable. They provide a central place where the IP addressed may be changed which is considerably easier than replacing those IP(s) throughout the file if a change needs to be implemented.

Zone directive
Master and slave zones are declared with the zone directive in the /etc/named.conf file. Every non-cached domain name must have a master zone so that authoritative records can be generated for queries.
For Example:

zone "mysite.com" {
type master;
file "mysite.com.zone"; # File name should indicate the zone.
};

zone "kernel.org" {
type slave;
masters { 192.168.192.5; };
file "kernel.org.zone";
};

Note: Slave zones look similar to their masters counterparts. The 'master' sub-directive must occur if the 'type' sub-directive equals 'slave'. A 'file' directive is used to store a local copy of the database which lessens the load on the master server. However, it is not required.

Reverse Lookup Zones
You also have to set reverse lookup zones. This is done as follows:
  1. Determine the network the zone should cover. For example, let us consider the network 172.100.10/24 .
  2. Reverse the order of octets in the network address. From above, we take 172.100.10 and reverse it to 10.100.172 .
  3. Append in-addr.arpa to the reversed string. Appending on to the result of step 2 we get 10.100.172.in-addr.arpa .
So the syntax for reverse lookup zones will be -

zone "10.100.172.in-addr.arpa" {
type slave;
masters { 172.100.10.1 };
file "172.100.10.zone";
};

Special Zones
Root Zone - Every BIND configuration must include a root zone. The root zone is used when a query is unresolvable by any other configured zones . The type of root zone is 'hint'.

zone "." {
type hint;
file "named.ca";
};

The file 'named.ca' contains information about root servers on the internet. This information rarely changes, but the latest version can always be obtained from rs.internic.net .
Loopback Zone - Though not strictly required, they should also be specified. Many programs like the X window system use local UNIX sockets to emulate IPC queues between cooperating processes. These sockets are bound to 127.0.0.1, the loopback address. Loopback zones should never be slaves.

zone "0.0.127.in-addr.arpa" {
# Specified like other reverse lookup zones.
};

This brings us to the end of editing the /etc/named.conf file.

In the next part, I will explain the syntax of the zone files which reside in /var/named/ directory.
To be Contd ...

Understanding Domain Name System (DNS)

September 04, 2005 6 comments
Domain Name System (DNS) makes it possible to refer to Internet Protocol (IP) based systems (hosts) by human-friendly names (domain names). Name Resolution is the act of determining the IP address (or addresses) of a given host name.

Benefits of DNS
  • Domain names can be logical and easily remembered.
  • Should the IP address for a host change, the domain name can still resolve transparently to the user or application.
The structure of Domain Names
  • Domain names are separated by dots, with the topmost element on the right. Eg: www.yahoo.com . IP addresses have topmost element on the left.
  • Each element may be up to 63 characters long. The entire name may be atmost 255 characters long.
  • The right most element in a domain name is called the Top-Level Domain (TLD). Referring the above example (www.yahoo.com), TLD is 'com'.
  • If a domain name is not shortened, it is called the Fully Qualified Domain Name (FQDN). For example, briefcase.yahoo.com can be specified by a machine in the yahoo.com domain as either briefcase.yahoo.com (FQDN) or as briefcase.
Host names map to IP addresses in a many-to-many relationship. A host name may have one or more IP addresses. Conversely, an IP address may have multiple host names associated with it.

Hosts that are designed to perform email routing are known as mail exchangers. These machines should have special purpose records in DNS called Mail eXchanger (MX) records. When a SMTP server or mail server, needs to send mail to a remote domain, it does a DNS lookup for the Mail Exchanger (MX) of that remote domain. A domain can and should have multiple mail exchangers. Mail that cannot be sent to one mail exchanger, can instead be delivered to an alternative server, thus providing failsafe redundancy.

Different types of Domain Name Servers
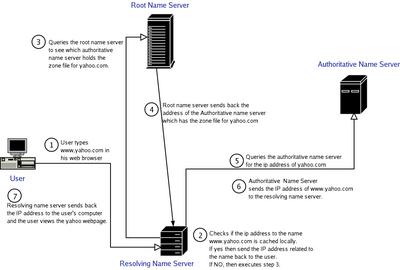
  1. Root Name server - Each top level domain (such as in,edu,com etc) has one or more root name servers which are responsible for determining where the individual records are held. These servers are fairly static and every machine on the internet has the capability of reaching any of them. A root name server is allocated like just one to three per country. For example, India has only 2 root name servers.
  2. Authoritative Name Servers - These are the servers that the Root name servers send queries to. These servers hold the actual information on an individual domain. This information is stored in a file called a zone file. Zone files are updated versions of the original HOSTS.TXT file.
  3. Resolving Name Server - These are the servers that do most of the work when you are trying to get to a machine with a certain host name. Besides being responsible for looking up data, they also temporarily store the data for host names that they have searched out in a cache, which allows them to speed up the resolution for host names that are frequently visited.
Zone
A zone keeps the information about the domain database. It does this by maintaining two types of files:
Zone File - It is used to map host names to address, to identify the mail servers, and to provide other domain information.
Reverse Zone File - This file is responsible for mapping IP address to host names, which is exactly the opposite of what the zone file does.

Note: The zone file and the reverse zone file has to be maintained by the user.

Name Server Hierarchy
Master Name Server - Also called primary server. This contains the master copy of data for a zone.
Slave Name Server - Also known as secondary server. This provides a backup to the master name server. All slave servers maintain synchronization with their master name server.
A zone may have multiple slave servers. But there will be only one master name server per zone.

Fig:
Step - by - step details of domain name resolution.


Configuring Apache webserver to restrict access to your website

April 06, 2005 2 comments
Apache Webserver is the most popular web server and has a market share of around 60%. Here I will explain a small but very useful feature of the apache web server - which is restricting access to (a part of) your website to only the privileged few by implementing username and passwords.
There are two ways of restricting access to documents.
  1. Either by the hostname of the browser being used
  2. By asking a username and password
The first method can be used to, for example, restricting documents being used within a company. But if the people who are accessing documents are widely dispersed, then the second method is more suitable.
Here I will explain the second method - ie, assigning username and passwords to users who are authorized to access the documents. This is known as user authentication.
Setting up user authentication takes two steps :
  1. Create a file containing username and passwords - Apache webserver has a utility called htpasswd to create the file containing username and passwords. Here I am creating a file called 'users' in the /usr/local/etc/ directory.
Note: For security reasons, the above file should NOT be under the document root. It can be anywhere BUT the document root.
The first time you run the htpasswd utility, you run it using the -c flag as follows:
# htpasswd -c /usr/local/etc/users gopinath
The -c argument tells htpasswd to create a new users file. When you run the above command, you will be prompted to enter a password for the user gopinath, and confirm it by entering it again. Other users can be added to the existing file in the same way, except that the -c argument is not needed. The same command can also be used to modify the password of an existing user.
After adding a few users, the /usr/local/etc/users file might look like this :
gopinath:WrU90BHQai36
kumar:iABSd12QWs67
ankit:Wer56HsD12s6
The first field is the username and the second field is the encrypted password.
Now comes the Apache server's configuration part. Open the apache server's configuration file /etc/httpd/conf/httpd.conf (your configuration file will be in different location depending on the distribution you are using) and look for the line :
AllowOverride None 
And change it to
AllowOverride AuthConfig
If you want to protect the document root itself, create a file '.htaccess' in the top directory path and include the following lines to it:
#File: .htaccess
AuthName "Only Valid Access"
AuthType Basic
AuthUserFile /usr/local/etc/users
require valid-user
AuthName - directive specifies a realm name for this protection. Once a user has entered a valid username and password, any other resource within the same realm name can be accessed with the same username and password.
AuthType - directive tells the server what protocol is to be used for authentication. At the moment, 'Basic' is the only method available. However, a new method, 'Digest' is about to be standardized, and once browsers start to implement it, Digest authentication will provide more security than Basic authentication.
AuthUserFile - tells the server the location of the user file created by htpasswd utility. A similar directive, AuthGroupFile, can be used to tell the server the location of a group's file.

Lastly don't forget to restart the web server which rereads the changed configuration files :
# service httpd restart
From here on when you try to access your protected site or the directory via the web browser, you will be asked for authentication first. And only those users whose name has been entered in the file pointed to by the AuthUserFile directive will be allowed access to your site.

How to install a Network card in linux

January 12, 2005 3 comments

This article is outdated. Please see - Configuring a network card in Linux for the updated information.


There are different ways of installing a network card in linux - and that too depending on the linux distribution that you are using. I will explain each one of these methods here.

The Manual method


Open the computer case and insert the network card into an empty PCI slot. Then boot up your machine to load linux.

In linux login as root and then navigate to the directory /lib/modules/ . Here you will find the modules supported by your system. Assuming that you have a 3Com ethernet card, in which case, the module name is 3c59x , you have to add this in the /etc/modules.conf file to let the machine detect the card each time the machine boots.

#File: /etc/modules.conf
alias eth0 3c59x

If you have only one network card, it is known by the name eth0, the succeeding network cards in your computer go by the name eth1, eth2 ... and so on.


Next, load the module into the kernel.

root# /sbin/insmod -v 3c59x

Configure an IP address for the network card using ifconfig or netconfig or any other method if your machine gets its IP address from a DHCP server. Eg:

root# ifconfig eth0 192.168.1.5 netmask 255.255.255.0 broadcast 192.168.1.255

The Easy way


RedHat/Fedora distributions of linux ships with Kudzu a device detection program which runs during systems initialization (/etc/rc.d/init.d/kudzu). This can detect a newly installed NIC and load the appropriate driver.

Then use the program /usr/sbin/netconfig to configure the IP address and network settings. The configuration will be stored so that it will be utilized upon system boot.

Also see Assigning an IP address to know more ways of configuring an IP address for your network card.