


Apache is a popular web server which has grabbed a major slice of the web server market. What is interesting about Apache is its stability and scalability which makes it possible to serve even very high traffic web sites without any hitch. It also helps that it comes with an unbeatable price (free). It is bundled by default with most Linux distributions. And in cases where it is not included in the CD, it is a simple case of downloading the package and installing it.
Here I will explain how one can set up Apache web server to serve ones web pages from your machine.
Packages to be installed
apache2 , apache2-common , apache2-mpm-prefork
And optionally ...
apache2-utils , php4 (If you need PHP support) , php4-common
Apache2 has a very modular structure. In fact if you see the directory structure of the configuration files (see figure below), you will realise that it is designed to avoid clutter. For serving web pages on our machine, we need be concerned with just two directories - them being, /etc/apache2/sites-available/ and /etc/apache2/sites-enabled/ .
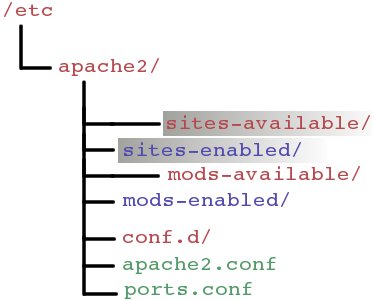 Fig: Apache2 directory structure
In the sites-available directory you create the files (can be any name) containing the configuration details of the sites you aim to host - one file per site. And in the sites-enabled directory, you create a soft link to the previously created file.
Configuration details
Let us assume for the sake of this tutorial that I have decided to host two websites on my local machine. All the files related to the two websites have already been created and saved in two separate directories by name websiteA and websiteB . The default location for serving the files in apache is usually in the /var/www location. So I move the two directories websiteA and websiteB to this location.
$ sudo cp -R -p websiteA /var/www/.
$ sudo cp -R -p websiteB /var/www/.Next I move into the directory /etc/apache2/sites-available in order to configure apache web server to recognize my sites. In this directory, there is a file called default which contains the configuration parameters. It is meant to be a skeleton file which can be used as a base for additional configuration.
I made two copies of this file in the same directory and renamed them as websiteA and websiteB. You can give any name really but for clarity it is prudent to give them the name of your site.
Now I opened up the file /etc/apache2/sites-available/websiteA in my favourite editor (vi) and made changes to the following portions (shown in bold):
#FILE: /etc/apache2/sites-available/websiteA
NameVirtualHost websiteA:80

<virtualhost websiteA:80>
ServerAdmin ravi@localhost
ServerName websiteA
DocumentRoot /var/www/websiteA/
<directory>
Options FollowSymLinks
AllowOverride None
</directory>
<directory /var/www/websiteA/>
Options Indexes FollowSymLinks MultiViews
AllowOverride None
Order allow,deny
allow from all
...
</directory>
...
...
</virtualhost>
In the above listing, ServerName indicates the name (or alias) with which your site has to be recognised. Usually a webserver will be hosting multiple sites with different domain names on the same machine. At such times, the webserver distinguishes between different websites through the ServerName directive. Since this is a local machine, I have given it the name websiteA. But in actual hosting where you want to make the website available on the net, you will be giving it your domain name say like www.mysite.com or something.
The DocumentRoot option denotes which files to be served when the server name is entered in the web browser. This usually points to the place where you have stored your website files.
You can have multiple Directory tags but one of them should point to the location of the website files.
I made similar changes to the file websiteB where the ServerName was given a unique name websiteB instead of websiteA as given above. Also the Directory tag contained the path /var/www/websiteB/ instead of websiteA.
Finally, because I was hosting this on my local machine and since I had not configured DNS, I had to edit the /etc/hosts file and include the name given in the ServerName portion of the configuration file. After the inclusion, my machine's /etc/hosts file looked as follows:
#FILE : /etc/hosts
127.0.0.1  localhost.localdomain localhost websiteA websiteB
That was it. Now in order to enable the websites, all I had to do was create a symbolic link to these files in the /etc/apache2/sites-enabled/ directory and restart the web server. It is quite clear that to disable a website, all you need to do is remove the symlink in the sites-enabled directory.
$ cd /etc/apache2/sites-enabled
$ sudo ln -s /etc/apache2/sites-available/websiteA .
$ sudo ln -s /etc/apache2/sites-available/websiteB .$ sudo apache2ctl restart
OR
$ sudo /etc/init.d/apache2 restartNow I tested it by opening up the web browser and typing http://websiteA to get the first website and http://websiteB to get the second website. Voila! Success!!.
Note: In previous versions of Apache, all these configuration parameters were inserted in the /etc/httpd/httpd.conf file. But I feel, apache2's configuration file layout is much more intutive and easier to manage.

15 comments:
I use apache instead of apache2. Reading your post, I feel apache2 configuration is easier than the flat file structure of apache.
@skate
Yeah! apache is much tougher to configure than apache2. I agree.
But is apache2 a rewrite of apache or its newer version? I use apache for hosting websites.
Nice article.
a trick (?) i learned a little while ago is using a2ensite and a2dissite to enable/disable a site. instead of ln -s etc.. it's interactive and asks you what site you want to enable/disable.
also try this:
# a2 (and press tab twice)
a2dismod a2dissite a2enmod a2ensite a2p
stoffell,
Thanks for sharing this very informative tip. It is nice to learn new things in the process of maintaining a blog :)
I was trying to host a website using the information you have provided here.
I am running apache server using XAMPP and i am not able to find the folders you mentioned.
The apache server is installed on my machine at /opt/lampp/etc
and no other files are found there.
http://localhost works but the index files are located at /opt/lampp/htdocs
maybe im missing a link here.
Any help would be appreciated
Best Regards
Sahim.
Sahim,
There are different flavors of apache webserver in use. The location of the configuration files on your machine depends on the version and type of apache you are using. The one explained in this article is for apache 2 which is different from that found in Fedora or Red hat.
thanks - very helpful information
-barney
I just wanted to know simple and and easy steps for apache configuration on my linux machine
how can i get apache2 sever ,which package i need to install,will it download from internet any one help me how to install & use apache2 in redhat,fedora
This is an extraordinarily helpful article. There are so few out there like this one that work as written. Thanks for posting!
Thanks for this practical article but I am facing problem while opening the page through the browser. The browser is saying that-"You don't have permission to access /index.htm on this server." Please help me in this regard. Thank you once again.
thanks for the blog post, you put the whole thing in to perspective. i have read through many tutorials on the same thing but there expectation of prior knowledge can be a bit to high, but your "how to" went right from the begging to the end without missing any steps out.
Robin
@ Amit
I'm definately not a dev, or even experienced linux user, but I think the problem is its chmodded wrong, I had that problem once, and sometimes files re chmod themselves on me for no apparent reason.
type:
sudo chmod -R 777 path/name/to/index.html
Cheers
I realise this blog entry is old but the steps are still valid! Thank you - I've been trying to get this sorted (for Zend Framework projects) for a day! Works as described on Ubuntu 11.04 running Apache/2.2.17. Thanks again :)
Post a Comment