


This is a review of Bodhi Linux - A light weight Linux distribution that runs the Enlightenment (E17) desktop.
Bodhi Linux is unique because it is one of the few Linux distributions that is based on the Enlightenment E17 desktop.
Showing posts with label OS reviews. Show all posts
Showing posts with label OS reviews. Show all posts
Ubuntu Ups the Ante with 12.04 LTS aka Precise Pangolin
April 26, 2012
Ubuntu 12.04 aka Precise Pangolin has officially been released. This is the next LTS version of Ubuntu. One week back, I had downloaded Ubuntu 12.04 (then in final beta) with an intent to try it out. After I installed it on my machine and started using it, I was very impressed. It is my opinion that the Ubuntu team has pulled off a success here. Unity interface which many people (including yours truly) were eager to banish to the boondocks has made a comeback. It is now simple to use, efficient, and beautiful.
If what I experienced in Ubuntu 12.04 is to be believed, Ubuntu is on the right track in becoming a common peoples operating system.
If what I experienced in Ubuntu 12.04 is to be believed, Ubuntu is on the right track in becoming a common peoples operating system.

Chrome OS Laptops - A Review
June 11, 2011
Here is a critical review of Google's Chromebook. I call it critical because the reviewer dwells more on the bad and the ugly of Chromebook. And he also works for Microsoft ;-).
Pinguy OS - An Ubuntu Based Linux Distribution on Steroids
January 19, 2011
Ubuntu has helped spawn umpteen Linux distributions. Pinguy OS is yet another Linux distribution based on Ubuntu (version 10.10 to be exact).
Pinguy OS is targeted at lay persons - people who are going to use Linux for the first time, or those who want an out-of-box working OS.
Pinguy OS is targeted at lay persons - people who are going to use Linux for the first time, or those who want an out-of-box working OS.
Haiku - A new Operating System inspired by BeOS
September 23, 2009
The Haiku R1 Alpha1 live CD ISO is only 380MB in size. Succumbing to curiosity, and because of its tiny size, I downloaded Haiku live CD and took it for a run. Simply put, I was really impressed with the user interface and the stability of the OS. I found the Haiku Desktop interface to be unique providing a radical approach to desktop computing.
Review : Arch Linux - A sleek, fast Linux distribution
December 12, 2008
I had always wanted to try Arch Linux. Mainly because, most people who used it became its ardent followers and, I wished to know what was the magic that pulled a Linux user to go the Arch Linux way.
An in depth look at gOS
November 23, 2007 0 commentsI had recently written a post on the gPC running gOS. Now here is an in depth review of the gOS which is honest,
Despite not being created by Google, the focus of gOS is Google's online applications such as GMail, Google News, Google Maps, Google Calendar, YouTube, etc. It's a neat concept for a Linux distribution.
... there seems to be no "recycling bin" available on the desktop. I looked in the FAQs and found that apparently the recycling bin is still in development—somewhat ironic given the nature/green theme of gOS.
The downloadable version of gOS doesn't include what's necessary to play DVDs and MP3s. For that you need to install it yourself or get gOS by buying a gOS-based computer.
Written by Jim Lynch at Extremetech, this review gives a very good insight into what you can expect from gOS without taking it for a spin. Has a couple of screenshots too. Read the whole review.
Review : EnGarde Secure Linux
October 15, 2007 5 comments
EnGarde Secure Linux is a Linux distribution that is tailor made with security in mind. This is a review of the Community edition of EnGarde Secure Linux which is freely available to download and use.
EnGarde Secure Linux is released by its parent company Guardian Digital in two forms - one is the Community edition which is available for free download and the other is the commercial Professional edition which includes support. The community edition of EnGarde is full featured, secure and is built entirely from open source and it contain many of the capabilities of the Professional edition.
Guardian Digital claims they have over 500 corporate clients across USA, Canada and the rest of the world who use EnGarde Secure Linux.
I decided to install the Community edition of EnGarde Secure Linux on my machine and take it for a spin.
One of the unique aspects of EnGarde Secure Linux is that it ships with only those packages that are absolutely necessary to function as a server. So you won't find software such as a X Windows server or other desktop utilities which is expected in any normal Linux distribution. What you will find are the necessary databases, web server, mail server and DNS server. You can configure EnGarde Secure Linux to function as any of those, or all of them.
EnGarde Secure Linux installs itself on your machine using a text based installer. If you just want to try out EnGarde Secure Linux, that is also possible because the ISO functions as a LiveCD as well. In the LiveCD mode, you can try out all the features that EnGarde Secure Linux has to offer without making changes to your hard disk.
Basically, These are the steps I had to go through in installing EnGarde Secure Linux on my machine.
 Fig: Booting from the CD-ROM (Check out all of them)
 Fig: Decide on the partitioning scheme. (Check out all of them)
That was it. EnGarde Secure Linux was now fully installed on my machine.
EnGarde implements security by following a number of rules.
It locks down the box in 3 ways namely -
At the host level, EnGarde Secure Linux implements a number of features such as TCP wrappers, restricted user rights at a global level, and SELinux policies in enforcing mode.
At the network level, EnGarde Secure Linux ships with a plethora of network tools which allow a system administrator to analyse the security level of his machine and take preventive measures. Among other things, it has a unique WebTool through which you can do any and all system administration tasks from a remote location including rebooting or shutting down the server.
This means that after installation, you can safely place the server in a locked room and not worry about its physical security.
Up to date security patches of software are released on a regular basis (more like every month) enabling system administrators to plug any security holes in the server software they run. This is automated to a certain level via the Guardian Digital Secure Network (GSDN). And you are prompted to register and create a GSDN account (for free) - it is not an option.
After installation, you can physically lock your computer running EnGarde Secure Linux away from prying eyes, behind closed doors.
This is because you can access it from any of your other computers in your network by typing the
You log in to the Guardian Digital WebTool using two different passwords depending on whether you are using EnGarde as a LiveCD or if you have installed it on a machine.
For LiveCD : The login name is
When Installed : The login name is
Here the first thing you need to do is register for a free GSDN account. The GSDN account provides up-to-date automated security fixes to your server. Next you have to change the root and WebTool password. Then specify the NTP servers as well as your geographic location. Lastly, you need to fine tune the services you would require to run on your remote server.
WebTool is the pivot with which you can effectively administer the system remotely from within a web browser.
A few things you can do using the WebTool are as follows.
To sum up, I found EnGarde Secure Linux to be a unique blend of a robust Linux server topped up with loads of security features coupled with the very powerful Guardian Digital WebTool which aids in administering the server remotely, all from within a web browser.
EnGarde Secure Linux is released by its parent company Guardian Digital in two forms - one is the Community edition which is available for free download and the other is the commercial Professional edition which includes support. The community edition of EnGarde is full featured, secure and is built entirely from open source and it contain many of the capabilities of the Professional edition.
Guardian Digital claims they have over 500 corporate clients across USA, Canada and the rest of the world who use EnGarde Secure Linux.
I decided to install the Community edition of EnGarde Secure Linux on my machine and take it for a spin.
One of the unique aspects of EnGarde Secure Linux is that it ships with only those packages that are absolutely necessary to function as a server. So you won't find software such as a X Windows server or other desktop utilities which is expected in any normal Linux distribution. What you will find are the necessary databases, web server, mail server and DNS server. You can configure EnGarde Secure Linux to function as any of those, or all of them.
Installation of EnGarde Secure Linux
EnGarde Secure Linux installs itself on your machine using a text based installer. If you just want to try out EnGarde Secure Linux, that is also possible because the ISO functions as a LiveCD as well. In the LiveCD mode, you can try out all the features that EnGarde Secure Linux has to offer without making changes to your hard disk.
Basically, These are the steps I had to go through in installing EnGarde Secure Linux on my machine.
 Fig: Booting from the CD-ROM (Check out all of them)
 Fig: Decide on the partitioning scheme. (Check out all of them)
- Change root and WebTool password - this is applicable only if you are using EnGarde as a LiveCD.
- Decide on whether you want DHCP or static networking
- Choose between running EnGarde in Installation mode or LiveCD mode - Here I chose Installation mode as I wanted to install it on my machine.
- Choose the language - English is default.
- Decide on the partitioning of your hard disk. You can either partition your hard disk automatically where the installer will create the necessary partitions - usually
/,/varand/home. Or you can choose to do it manually.
EnGarde Secure Linux cannot reside next to another OS. If you choose to install EnGarde Secure Linux, it will wipe your hard disk prior to installing itself.
- Decide on the type of hard disk - whether IDE or SCSI.
- Choose the packages - The packages are broadly classified into 6 sections namely Databases, DNS, Firewall, Mail services, Network Intrusion Detection and Web services. I selected all the packages and pressed OK and the installer started copying all the files to the hard disk.
- Next I had to configure the network card and provide information such as the IP address, netmask, the default gateway and the network address.
- Then it prompted me to provide a fully qualified domain name for my machine.
- Lastly I had to enter the IP address of the primary and secondary name server.
That was it. EnGarde Secure Linux was now fully installed on my machine.
Facts at a glance
- Very secure out of the box.
- Cost effective - Helps companies & corporations reduce support costs.
- Comprehensive audit system - provides accountability.
- Can be fully configured from a remote location via any web browser.
- Around 220 packages are included with EnGarde Secure Linux. You can add another 300 of them using the customized WebTool.
- EnGarde is available for i686 and x86 64 bit architectures and uses
RPMpackages managed by theapt-getcommand line tool. - Very well documented. Check out the video tutorials and documentation.
How secure is EnGarde Secure Linux
EnGarde implements security by following a number of rules.
It locks down the box in 3 ways namely -
- Host level
- Network level, and
- Releasing up to date security patches for software.
At the host level, EnGarde Secure Linux implements a number of features such as TCP wrappers, restricted user rights at a global level, and SELinux policies in enforcing mode.
At the network level, EnGarde Secure Linux ships with a plethora of network tools which allow a system administrator to analyse the security level of his machine and take preventive measures. Among other things, it has a unique WebTool through which you can do any and all system administration tasks from a remote location including rebooting or shutting down the server.
This means that after installation, you can safely place the server in a locked room and not worry about its physical security.
Up to date security patches of software are released on a regular basis (more like every month) enabling system administrators to plug any security holes in the server software they run. This is automated to a certain level via the Guardian Digital Secure Network (GSDN). And you are prompted to register and create a GSDN account (for free) - it is not an option.
Guardian Digital WebTool
After installation, you can physically lock your computer running EnGarde Secure Linux away from prying eyes, behind closed doors.
This is because you can access it from any of your other computers in your network by typing the
https://your-machine-ip-address:1023/ address in a web browser.You log in to the Guardian Digital WebTool using two different passwords depending on whether you are using EnGarde as a LiveCD or if you have installed it on a machine.
For LiveCD : The login name is
admin and the password is the root password you set while booting the EnGarde Linux CD. When Installed : The login name is
admin and the password is lock&box. And the first time you log into the Admin section, you are confronted with an initial configuration screen.Here the first thing you need to do is register for a free GSDN account. The GSDN account provides up-to-date automated security fixes to your server. Next you have to change the root and WebTool password. Then specify the NTP servers as well as your geographic location. Lastly, you need to fine tune the services you would require to run on your remote server.

WebTool is the pivot with which you can effectively administer the system remotely from within a web browser.
A few things you can do using the WebTool are as follows.
- Manage users
- Manage database servers
- Configure the web server (Apache)
- Implement DNS,
- View all the security logs
- Manage mail servers,
- Enable and disable system level services
- Configure firewall
- Run most of the security tools such as snort bundled with EnGarde and view their output in the web browser.
The WebTool is a one stop shop for troubleshooting and managing your server from a remote location.
To sum up, I found EnGarde Secure Linux to be a unique blend of a robust Linux server topped up with loads of security features coupled with the very powerful Guardian Digital WebTool which aids in administering the server remotely, all from within a web browser.
PC-BSD 1.3.4 Review
May 22, 2007 20 commentsFreeBSD along with OpenBSD and NetBSD form the triumvirate of BSD operating systems. Traditionally these BSDs are server centric operating systems - ie. those which are tuned to be run on a server rather than to be used by the end user as a desktop. Still, with a bit of tweaking and configuration, all the three of them can be used as viable desktop operating systems.
PC-BSD is a direct descendant of FreeBSD. As the name indicates, PC-BSD is a BSD operating system which lays stress on its use as a Desktop catering to the end users. From the point of its inception, the USP (Unique Selling Point) of PC-BSD has been to make it as easy as possible to install, update and use software, at the same time bringing all the powerful security features and stability of the traditional BSDs. Over one year back, I had reviewed PC-BSD 1.00 and if you have read the review, you would have found that my initial impression of this operating system was very positive. In the succeeding months many changes have taken place for PC-BSD. For one, in October 2006 PC-BSD got acquired by iXsystems which is now in control of the project - though Kris Moore, the founder of PC-BSD is still its project leader and has the final say. Apart from the acquisition, the project has moved quite smoothly.
One of the main changes I can see for PC-BSD 1.3 when compared to ver 1.0 is the drastic enhancement of the graphical installer with a couple of additional options thrown in. For example, at the time of installation, there is an option to encrypt the swap partition, there are options to open or close most popular ports such as the port used by SSH and so on, a choice of enabling or disabling the firewall and with a few clicks you finish installing the OS.
 Fig: PC-BSD desktop
The current version of PC-BSD is ver 1.3.4. Some time back, I had downloaded ver 1.3.0 of PC-BSD and had installed it on my machine. The PC-BSD team have made it possible to upgrade the OS to the most recent version - 1.3.4 by downloading and installing a couple of patch files. Thus I had to download and install just over 40 MB of patch files which are made available in PBI format, to upgrade PC-BSD from ver 1.3.0 to 1.3.4. As a matter of fact, you do not even have to download individual files yourself to upgrade the OS. There is a GUI tool called "PC-BSD Online Update" which can be accessed by navigating through KDE Menu -> Settings -> System Administration -> "PC-BSD Online Update", that can be configured to automatically detect if there are updates available and then download and install them for you.
Post Installation scenario
It is really remarkable that the installation of PC-BSD went without any glitch and all the peripherals were detected properly. Sound worked out of the box and in no time, I was face to face with the graphical login screen. PC-BSD is a KDE centric operating system and comes with the latest version of KDE ver 3.5.5 and many useful software installed by default.
Once I logged into PC-BSD, I navigated to the PBI resource web page which contain the latest versions of most popular software such as FireFox 2.0.0.3, OpenOffice.org and so on and started installing those software which I use on a regular basis. As far as PC-BSD is concerned, you do not have to worry about dependencies as each PBI is a stand alone package which contain all the necessary libraries needed to run the program. So FireFox PBI will contain not just the FireFox binary but also dependent libraries as well.
 Fig: It is possible to schedule the update of the OS to install security patches.
The PBI (short for PC-BSD Installer) is a GUI installer that is similar to its Windows counterpart, and is coded using Qt. To install a software, just double click on the respective PBI and follow the instructions. You also have the option of cleanly uninstalling the software from within the PC-BSD software manager.
 Fig: View and remove the installed PBIs
Essential housekeeping in PC-BSD
One of the first things you should do the first time you boot into PC-BSD is to update the ports and install them. PC-BSD uses the FreeBSD 6.1 ports. And when you install software using the ports, you are essentially installing FreeBSD software. But unlike FreeBSD where you have to dabble with command line to update and install the ports, in PC-BSD, you can do the same using the GUI front-end with the click of a button (See the image below).
 Fig: Install ports with the click of a button
Next I had to install the multimedia codecs to enable PC-BSD to play audio and video files in proprietary media formats. As with all Open Source projects, PC-BSD also follows the principle of not shipping the proprietary codecs by default and requires that the end user install them by themselves if they want to. Here is the interesting part. To install the multimedia codecs, all I had to do was to download and install the requisite PBI file from the PBI online repository. And viola!!, I was able to not only play wmv and quick time files but also watch encrypted DVD movies as well.
 Fig: Kaffene media player detects all the codecs.
I have an Nvidia graphics card and I wanted PC-BSD to harness the full potential of the graphics card. Usually you can get along very well with the Nvidia open source driver but if you want to use OpenGL programs for instance, you need to install the proprietary driver. In the PBI repository, you will find a number of builds of Nvidia proprietary drivers for PC-BSD and you can choose the best package which works for you.
I found enabling Flash to be a little tricky affair. Mainly because Adobe has not yet released Flash Player ver 9.0 for BSDs. And the native build of Flash player for BSDs is still at ver 7.0. While you can very well install this version of flash player, many flash enabled websites now a days require you to have version 8.0 or above to view them - a big handicap for BSD users. One work around you have for PC-BSD is to install the Linux version of FireFox web browser. You heard me right. It is possible to install most Linux software and run them without any modification in PC-BSD. This is made possible because PC-BSD has a Linux compatible module installed.
I installed the Linux version of the latest build of FireFox from the PBI online repository as well as the Flash player ver 9.0 from here. And I was able to view flash websites without any problem. Of course I encountered a minor glitch in that each time I open two flash based websites simultaneously, Linux version of FireFox crashes. But by and large I was able to manage as long as I had only one flash website open at any given time.
I installed the Linux version of the latest build of FireFox from the PBI online repository as well as the Flash player ver 9.0 from here. And I was able to view flash websites without any problem. Of course I encountered a minor glitch in that each time I open two flash based websites simultaneously, Linux version of FireFox crashes. But by and large I was able to manage as long as I had only one flash website open at any given time.
I also downloaded and installed Sun's JDK 1.5 from the PBI online repository.
Is PC-BSD a FreeBSD clone ?
At first glance, one might be tempted to pass off PC-BSD as a clone of FreeBSD with some frills thrown in, as PC-BSD uses the FreeBSD ports. And it is easy to think that if you are installing software using ports, you are essentially getting FreeBSD software. But on close scrutiny, I was able to find notable differences. Some of them are as follows :
- A GUI installer which eases the installation process.
- Use of PBIs to install many software.
- Incorporating OpenBSD's robust and powerful PF firewall instead of the firewall bundled with FreeBSD.
- Many GUI front-ends which aid package management.
- Easily start/stop and enable/disable services via its equivalent GUI.
- Use of blacklist script to automatically ban IP addresses of machines of potential crackers who try to hack into your machine.
- The three BSDs namely FreeBSD, OpenBSD and NetBSD have their own independent ports. PC-BSD team could also start maintaining its own independent ports system instead of depending on the FreeBSD ports. One disadvantage of depending on FreeBSD ports is that you have to sometimes wait a long time before the software gets updated in the ports.
Take for instance GnuCash finance software. It is not easy to create a standalone PBI of GnuCash as it has to satisfy a lot of dependencies. And as of now the FreeBSD ports have the older version (1.8) of GnuCash which is markedly different from the latest version of ver 2.0 especially in the file format which the respective versions use to save the data. And the PC-BSD team has to wait until the GnuCash port has been updated to the latest version by the FreeBSD port maintainers. Truth be told, there is a GnuCash 2.0 place holder in the ports I downloaded in PC-BSD but when I give the command :# make install clean
... it complains that guile package is an older version and GnuCash requires a newer version of the same. These snags could be done away with if PC-BSD maintains its own ports with periodic selective syncing with FreeBSD ports.
===> gnucash-2.0.5_3 depends on package: guile>=1.6.8_2 - not found
===> Found guile-1.6.8_1, but you need to upgrade to guile>=1.6.8_2.
*** Error code 1
Stop in /usr/ports/finance/gnucash.
*** Error code 1 - When a user enters a root password to do system administration tasks using GUI, PC-BSD should offer to remember the root password so that the user does not have to enter it the next time he want to run a program in super user mode. Many Linux distributions such as Debian and Fedora have this feature. At present, if I want to install say 10 PBI's I have to enter the root password 10 times - ie. each time I execute the PBI, it asks for root password which gets really tedious. KDE dialog has a check box which offers to "keep the password" but it doesn't seem to have any effect.
- The PBI should have an option to install software system wide or on a per user basis. This suggestion might seem strange but in a multi-user environment, it is not possible to hand over the root password to every one. And if a user wants to try out a software by downloading the PBI, he should be allowed to install it in his home directory if he cannot enter the root password.
- The PBI should also support execution from the command line. This is not a must have feature but it can be convenient to execute and install a PBI package in certain situations where you have booted into console mode.
- It would be nice to have a GUI front-end which allows a lay person to write custom firewall rules for PF.
PC-BSD is turning out to be an excellent alternative to other popular Desktop OSes. After testing and using PC-BSD for some time now, I can't but admire the sheer amount of work that is put into creating, developing and molding an OS for the lay person albeit with a strong slant towards FreeBSD. The fact that PC-BSD is able to accomplish all the tasks expected by an end user - be it using the Internet for communication, listening to music, watching movies or using it for recreation purposes holds it in good stead as a viable Desktop OS.
OpenSuSE 10.2 Review
April 02, 2007 20 commentsWhen you ask someone to name a couple of GNU/Linux distributions, in most cases, you will hear the names Debian, Red Hat, Ubuntu and then, SuSE Linux which is now a days known as OpenSuSE.
The reason is that apart from it being one of the oldest Linux distributions around, it has made a name as a distribution which is robust, secure and user friendly. Originally SuSE Linux was owned by a German company by the same name. But in January 2004, it was acquired by Novell which continued to further develop and fine tune it and include more SuSE specific features to it. The end result is a distribution which has grown to have its own unique identity. OpenSuSE is a community program sponsored by Novell and is developed in an open model.
One of the foremost reason to consider OpenSuSE Linux as a very popular Linux distribution is the mere fact that in the past couple of months, it has risen from the bottom of the heap to enjoy second place, just below Ubuntu Linux, in the Distrowatch most popular Linux distributions list.
This rise in popularity is not incidental. Rather it highlights the quality of this very fine distribution.
A couple of months back, I chanced upon a DVD of OpenSuSE 10.2. While in the past, I have installed a plethora of GNU/Linux distributions, this was the first time I happened to lay my hands on SuSE Linux distribution. And to tell you the short story, I was virtually blown away with its ease of installation and use. While the partition manager embedded in the SuSE installer is not as graphical as that found in Fedora installer, in all other respects it is very functional and intuitive. One thing worth noting is that OpenSuSE comes with flash player (albeit ver 7.0) and Sun Microsystems Java 1.5 runtime environment bundled with it by default and at the time of installation you have to agree to the license requirements of the respective software.
 Fig: Redesigned Gnome Menu
The minimum specification for installing OpenSuSE Linux is a Pentium class processor, at least 256 MB RAM and plenty of disk space. The OpenSuSE installer detected all the devices attached to my machine without any problem. While it is pretty bleak to see a Linux distribution not detect any particular device barring wireless devices or internal modems, you can make sure that your laptop/desktop is supported by OpenSuSE by checking their hardware compatibility list (HCL). Once I finished installing the distribution and booted into it, I came face to face with a clean Gnome desktop. What is unique about the OpenSuSE Gnome desktop is that it includes a redesigned menu different from what you will find in the default Gnome setup. More over, the search is integrated in the menu with Beagle search playing a very important role in providing real time search. This is not surprising as projects such as Beagle search and Tomboy are developed by Novell engineers and is based on Mono language; which is also the initiative of Novell.
There is a central place called the "Control center" which can be accessed by clicking on the start bar (named "Computer" in OpenSuSE Gnome Desktop) and then clicking the "Control center" in the menu. Here all the applications are categorized by type or functionality which in my opinion makes it easy to navigate. Though the menu in the Panel of KDE is also redesigned, I found the Gnome menu much more pleasant to use than that found in KDE. But in KDE, there is an option to switch to the classic view which can be done by right clicking on the menu button and choosing "classic view". I couldn't find a similar method to switch in Gnome though.
 Fig: Control center
By default OpenSuSE provides KDE and Gnome and you have to choose one over the other at the time of installation. But if you select a custom setup , then you can easily install packages specific to other window managers and desktops.
Over a period of time, Novell has also built a massive collection of documentation, tips, faqs and howtos related to accomplishing tasks in OpenSuSE which can be viewed here.
OpenSuSE Linux uses the RPM format to distribute its packages. And there are more than one ways of installing packages. But the most popular form of installing software in OpenSuSE is using YaST which does a good job of automatically checking for any dependencies.
A brief introduction to YaST
YaST is a unique tool found in OpenSuSE which allows one to do all the system administration tasks from within its GUI interface which includes package management, managing users, configuring firewall, configuring devices and almost all the other system maintenance and network administration tasks you could think of. It can also be used from the command line. YaST2 comes with three front-ends. GTK, QT and ncurses. And you can start the "YaST control center" using the command yast2. The correct front-end is automatically selected based on the available components and the current environment.
YaST supports the following modules to load the requisite GUI front-end. They are as follows :
answering_machine, bootloader, ca_mgm, dhcp-server, dns, dns-server,fax, firewall,Here is how yast2 can be used from the command line.
groups, host, http-server, idedma, inetd, irda, kerberos-client, keyboard, lan,
language, ldap, mail, mouse, nfs, nfs_server, nis, nis_server, ntp-client, power-management,
powertweak, printer, profile-manager, proxy, remote, routing, runlevel, samba-client,
samba-server, security, sound, sysconfig, tftp-server, timezone, tv, users.
To load the interface of a specific module you use the following syntax :
# yast2 <module name>For example, if I want to add more users to the system, I can use the following command :
# yast2 users... which will load the GUI front-end for adding users. For starting the power management utility, run the yast2 command as follows:
# yast2 power-management.., and so on. You can also start YaST in interactive mode by passing it the phrase 'interactive'. For example, when you use the command :
# yast2 users interactive
YaST2 users> help
OpenSuSE will place you in the 'YaST users' interactive shell where you can run commands to add, remove or modify user data. After you are done, you can press 'exit' or 'abort' to come out of the shell.
AppArmor - OpenSuSE's unique security feature
While other main stream Linux distributions such as Red Hat and Debian have beefed up their defenses by incorporating SELinux into their structure, OpenSuSE has traveled a different path. Instead of SELinux, it comes bundled with its own security framework tool called AppArmor.
Novell claims AppArmor is equally robust and provides similar application level access controls with the exception that it is much more easier to configure and maintain than SELinux. The apparmor profile used by default makes OpenSuSE very secure. You can read more about Apparmor here.
Pros of OpenSuSE 10.2
- Robust and secure GNU/Linux distribution
- A good collection of software including easy availability of proprietary ones packaged in the SuSE RPM format. For instance, you can easily install proprietary Nvidia graphics drivers using YaST.
- Excellent GUI front-ends for almost all system and network administration tasks.
- Has incorporated some cutting edge features in Gnome and KDE desktop such as the redesigned Panel Menu.
- Good all round integration of Beagle search.
- Bundles with it Flash player and Sun's JDK 1.5 by default.
- Has an easy graphical method to enable/disable XGL if you like special effects on your desktop.
- To put it lightly, I found OpenSuSE 10.2 to be a memory hog. On my machine with 640 MB RAM, it was sufficiently slow. I attribute it to the number of services running on OpenSuSE by default.
- With the recent cloud formed over Novell striking a deal with Microsoft, many in the open source and Free software community are concerned about the direction in which Novell is going to steer SuSE in the future. There are also aspersions cast on whether this fine GNU/Linux distribution will remain Free at all.
A brief look at Slackware 11.0
October 23, 2006 21 commentsWhen you hear the name Slackware, you are at once transported to a world where Linux users feel more at home in setting the configurations by editing ordinary text files. In fact the credo of Slackware is to keep it as simple as possible. In popular speak, it is known by the acronym KISS (Keep It Simple Stupid). When I use the word simple, I mean simple in relation to a person who is already well versed in the use of Linux. So you won't find any Slackware specific memory hogging GUI front-ends to set up simple day to day configuration parameters. Apart from the ones provided by KDE - the default desktop of Slackware, you will not find any GUI helper apps as are common in other popular Linux distributions.
Another aspect of Slackware which has amazed me is that the whole project is the outcome of the efforts of one person - Patrick Volkerding. He has designed Slackware around the idea that the system should be a complete installation kept updated with any official patches. I couldn't help thinking that perhaps Patrick had been an avid user of one of the BSDs before he started the Slackware project and had been swayed enough to make Slackware as similar to the BSD which also consider the kernel together with the tools bundled with it as a single entity.
The latest version of Slackware is ver 11.0 which was released a couple of weeks back. Blame it on my internet connection, but in the past, I have had difficulties in downloading the ISOs of Slackware but this time round, I was successful in downloading and burning Slackware 11.0 on to the CDs. The whole Slackware distribution will fit into 3 CDs. If you do not care about X, then you can easily manage with just the first CD which contain a collection of Linux kernels and all the command line tools. But if you want to install KDE, you will need the second one. The third CD contain miscellaneous packages such as the language packs. It is prudent to download all the three CDs even though the installer bundled with Slackware will allow you to pick and choose between packages.
And while talking about the installer, Slackware comes bundled with a text based installer which is very similar to that found in FreeBSD. That means, you have a master menu which contain sub-menus to execute different functions. Such as a menu for partitioning the hard disk, a menu to format the disk, one for setting up and turning on swap, one to start the copying of packages to the hard disk and so on. And once all the tasks are completed, you are placed back into the master menu. The whole process is quite intuitive for anybody who has prior experience in installing an OS using a text installer. Of course unlike other Linux distributions, when you boot the computer using the first CD, you are put into a root shell and you have to type the command 'setup' to initiate the Slackware installation process.
I chose the full install since I had with me all the 3 CDs and within a little time all the packages were installed on one of the partitions on my machine which took around 4.0 GB space. Oh yeah, Slackware still bundles with it the LILO boot loader when most Linux distributions have graduated to the more user friendly Grub. Since I already had Grub installed in the MBR on my machine, I chose to edit the grub menu to include Slackware instead. During the installation, Slackware correctly detected the Windows NTFS and Fat32 partitions on my drive and prompted me for the path where I wanted it to be mounted.
The default kernel in Slackware is still the battle worn time tested 2.4 series (2.4.33.3) but you can also opt for the latest 2.6 (2.6.17.13) version of kernel at the time of installation by entering the command 'huge26.s' at the boot prompt.
As far as window managers are concerned, Slackware bundles with it a total of seven window managers which includes KDE 3.5.4, Xfce 4.2.3.2, Fluxbox, Blackbox, WindowMaker, Fvwm2 and Twm. But if you are a die hard Gnome user, then you will be disappointed though because Pat has long since discarded Gnome for its perceived difficulty in maintenance.
Slackware follows the BSD style init scripts
One note worthy fact about Slackware is its adoption of the BSD style init scripts over the System V init scripts more commonly embraced by the rest of the Linux distributions. What it translates for the Slackware user is simplicity in enabling and disabling services. You do not have to dirty your hands by changing the sym-links as you do in System V init scripts.
For example, say I want to enable the firewall in Slackware when it is booting up. All I have to do is move to the /etc/rc.d/ directory and set the executable bit of the file rc.firewall. And the next time Slackware boots up it will have the firewall up and running. On a similar note if you want to disable the firewall, then just unset the executable bit of the file rc.firewall. But that is not all. The contents of the rc.firewall file are in the same format as the iptables rules you enter in the command line which makes it quite easy to maintain in the long run. There is no iptables-save or iptables-restore for you.
Similarly for loading any extra drivers in the Linux kernel, you enter the module name in the liberally commented rc.modules file. For each service that is available in the system, there is a corresponding rc.<servicename> bash script in the /etc/rc.d/ directory and depending upon whether the executable bits are set or unset, Slackware chooses to start/stop the service during system startup.
Useful configuration scripts in Slackware
Earlier I had mentioned the obvious lack of any Slackware specific GUI front-ends. Well, it was more of a white lie ;-). Even though there are no GUI front-ends for configuration, there are a collection of curses based programs (scripts) which you can use to set up and configure a variety of features in Slackware including setting up networking. Some of them that I am aware of are as follows:
- netconfig - A menu based program that will help in configuring your network.
- pppsetup - A menu based program that helps in connecting to the Internet via a dial up modem.
- xwmconfig - Choose your default window manager.
- liloconfig - Setup and install LiLO to the boot drive.
- xorgcfg - Setup the configuration for X Windows. It will automatically generate the xorg.conf file which is saved in the /etc/X11/ directory.
- alsaconf - Automatically detects the sound cards and configures the sound.
More over, Slackware specific tools like Swaret, Slapt-get - a clone of apt-get and Slackupdate make it easy to keep the system updated with the latest security patches or even upgrade the entire system to a new version.
I have been using Slackware for a couple of weeks now and I am definitely impressed with the ease with which you can configure it. And I have started to really like this distribution. I did face some issues once I finished installing Slackware. Like I had to modify the xorg.conf file to get my mouse wheel to work also I had to run alsaconf to get sound to work properly. But nothing serious which warranted any drastic action.
Even though Slackware does not bundle Gnome with it, there is a separate project called Dropline Gnome which provide Slackware specific packages of the latest version of Gnome. Another site which caters to the Slackware crowd is linuxpackages.net which is a repository of Slackware packages.
Slackware is one of the oldest Linux distributions out there. And over the years, it has consistently kept pace with the changes. All the software bundled with Slackware 11.0 is the latest version - for instance Vim 7.0 is included, so is Firefox 1.5.0.7. And this is a remarkable feat since it is a project borne off the efforts of one man - Patrick Volkerding.
A concise guide to installing and using FreeDOS ver 1.0 in GNU/Linux
September 27, 2006 12 comments
I have always looked at the DOS operating system with some nostalgia. At a time when networking as you see now was confined to some labs or universities in the US, and one had to put up exclusively with floppies to transfer data from one computer to another, DOS was a big player atleast on the home front. I have fond memories of playing games such as pacman, Dig Dug, galaga, ..... on Dos.
I clearly remember the Win 3.1 operating system which was entirely built on top of MS-DOS. But when networking between computers became more common, Dos (or MS-DOS as it was known) started revealing its shortcomings as it is not a network operating system and was designed to be run on standalone machines. More over it did not have true multi-tasking, multi-user functionality. Recognizing these drawbacks, Microsoft decided to move on and built the Windows 95/98/NT/2000/XP OSes and gradually shifted base from a DOS based kernel to an entirely new network operating system as you see in Windows 2000/XP.
FreeDOS is a project which aims to recreate the magic of DOS and bring a truly free GPLed DOS encompassing all the characteristics of MS-DOS with lots of improvements thrown in. A couple of weeks back, FreeDOS developers released ver 1.0 of their OS. I downloaded the full CD ISO of FreeDOS from their website which was around 153 MB in size.
Qemu is an emulator which can be used to run a variety of OSes inside a host OS. It is well supported on the Linux platform with ports available for Windows and Mac OSX. If it is not already installed, you can install it from your Linux distribution's repository. In Ubuntu Linux, you can install Qemu as follows.
Next, I created a directory
In Linux, everything is considered a file. So the hard disk, the monitor, the keyboard, mice are all recognised as files by the OS. By the same logic, it is possible to install programs and entire OSes into a file, the only requirement being the file should be large enough to store what ever is intended to be stored in it.
My intention was to install FreeDOS into a file and boot it using QEMU. I roughly estimated that 400 MB space is ample for installing and working in FreeDOS and so created a raw file named
Now lets check out the contents of the
To initiate the installation of FreeDOS, I used the following command:
The
Now I was presented with the FreeDOS installer.
The installation itself is quite simple. It involves formating the hard disk (in my case the image), selecting the packages, and copying the files to the hard disk. All the steps are detailed in the screenshots below.


base - Essential DOS utilities which reproduce the functionality of MS-DOS
compress - Free file compression and decompression utilities (7zip, arj, bzip2, cabextract, gzip, tar, zoo ...)
driver - Free drivers for network cards and usb
edit - A collection of editors (emacs, vim, pg, setedit, ospedit)
games - A good choice of free DOS games - Doom, Solitare, BumpNJump, nethack, tetris...
gui - Gem Desktop (Very nice)
lang - Free compilers and assemblers (Pascal,C,Basic,assembler,Fortran, debuggers,make tool...)
media - Free multimedia applications (cdrtools, ogg vorbis, mpxplay,lame ...)
net - Networking programs (wget, VNC, SSH client, lynx, arachne, mail client, wattcp - a free TCP/IP stack for DOS).
util - Free file, directory and other utilities (fprot anti virus, locate, head, du, cal, dos32ax, tail, tee, 4dos, uptime ...)
Post installation, I used the following Qemu command to boot into FreeDOS.
To have access to the floppy drive from within FreeDOS, the Qemu command as follows:

Fig: Mine game in progress

Fig: Open Gem Desktop

Fig: Arachne Web Browser
I clearly remember the Win 3.1 operating system which was entirely built on top of MS-DOS. But when networking between computers became more common, Dos (or MS-DOS as it was known) started revealing its shortcomings as it is not a network operating system and was designed to be run on standalone machines. More over it did not have true multi-tasking, multi-user functionality. Recognizing these drawbacks, Microsoft decided to move on and built the Windows 95/98/NT/2000/XP OSes and gradually shifted base from a DOS based kernel to an entirely new network operating system as you see in Windows 2000/XP.
FreeDOS is a project which aims to recreate the magic of DOS and bring a truly free GPLed DOS encompassing all the characteristics of MS-DOS with lots of improvements thrown in. A couple of weeks back, FreeDOS developers released ver 1.0 of their OS. I downloaded the full CD ISO of FreeDOS from their website which was around 153 MB in size.
Using Qemu to install FreeDOS in Linux
Since I have been using Linux as my operating system, I decided to install and use FreeDOS inside Linux by means of an emulator. In the past, I have used Qemu to run Damn Small Linux on my Ubuntu machine. And I was pleased with its performance. So I decided to use Qemu to run FreeDOS as well.Qemu is an emulator which can be used to run a variety of OSes inside a host OS. It is well supported on the Linux platform with ports available for Windows and Mac OSX. If it is not already installed, you can install it from your Linux distribution's repository. In Ubuntu Linux, you can install Qemu as follows.
$ sudo apt-get install qemu
Next, I created a directory
/opt/freedos and moved the downloaded FreeDOS ISO file into it.$ mkdir /opt/freedos $ cp fdfullcd.iso /opt/freedos/.
Preparing an image to hold the FreeDOS
In Linux, everything is considered a file. So the hard disk, the monitor, the keyboard, mice are all recognised as files by the OS. By the same logic, it is possible to install programs and entire OSes into a file, the only requirement being the file should be large enough to store what ever is intended to be stored in it.
My intention was to install FreeDOS into a file and boot it using QEMU. I roughly estimated that 400 MB space is ample for installing and working in FreeDOS and so created a raw file named
freedosfile.img roughly of size 400 MB using the dd command as follows:$ cd /opt/freedos $ dd if=/dev/zero of=freedosfile.img bs=1024 count=400000 400000+0 records in 400000+0 records out 409600000 bytes (410 MB) copied, 18.9476 seconds, 21.6 MB/s
Now lets check out the contents of the
/opt/freedos/ directory.$ ls -l /opt/freedos -rw-r--r-- 1 ravi ravi 160184320 2006-09-05 02:11 fdfullcd.iso -rw-r--r-- 1 ravi ravi 409600000 2006-09-12 10:38 freedosfile.img
Installation of FreeDOS
To initiate the installation of FreeDOS, I used the following command:
$ qemu -cdrom fdfullcd.iso -hda freedosfile.img -boot d
The
qemu options used in the above command are described below. -cdrom - points to the ISO image of FreeDOS.-hda - passes the name of the hard disk. In our case, a file freedosfile.img functions as the hard disk.-boot takes different options one of which d denotes to boot from the CD-ROM.Now I was presented with the FreeDOS installer.
Installation steps for FreeDOS
The installation itself is quite simple. It involves formating the hard disk (in my case the image), selecting the packages, and copying the files to the hard disk. All the steps are detailed in the screenshots below.
What you will find in FreeDOS
The FreeDOS OS is split into 10 packages each pertaining to a particular aspect of the OS. They are as follows:base - Essential DOS utilities which reproduce the functionality of MS-DOS
compress - Free file compression and decompression utilities (7zip, arj, bzip2, cabextract, gzip, tar, zoo ...)
driver - Free drivers for network cards and usb
edit - A collection of editors (emacs, vim, pg, setedit, ospedit)
games - A good choice of free DOS games - Doom, Solitare, BumpNJump, nethack, tetris...
gui - Gem Desktop (Very nice)
lang - Free compilers and assemblers (Pascal,C,Basic,assembler,Fortran, debuggers,make tool...)
media - Free multimedia applications (cdrtools, ogg vorbis, mpxplay,lame ...)
net - Networking programs (wget, VNC, SSH client, lynx, arachne, mail client, wattcp - a free TCP/IP stack for DOS).
util - Free file, directory and other utilities (fprot anti virus, locate, head, du, cal, dos32ax, tail, tee, 4dos, uptime ...)
Booting into FreeDOS using Qemu
Post installation, I used the following Qemu command to boot into FreeDOS.
$ qemu -hda freedosfile.img -boot c
To have access to the floppy drive from within FreeDOS, the Qemu command as follows:
$ qemu -hda freedosfile.img -fda /dev/fd0 -boot c
Features of FreeDOS
- Install and run 100s of free DOS games.
- Many Linux based command line tools have been ported to FreeDOS. Eg: cal, head, tail, ls, tar, gzip, bzip2, lynx, wget and so on.
- Low memory footprint.
- Run many useful DOS programs.
- Offers a nostalgic experience.
A few programs running in FreeDOS
Fig: Mine game in progress
Fig: Open Gem Desktop
Fig: Arachne Web Browser
A Tryst with Debian Etch Beta 3
August 28, 2006 25 commentsWhen a Linux enthusiast hears the name Debian, it never fails to instill in him some awe and respect. After all, this is the one and only not-for-profit Linux distribution which has singularly built up a name synonymous with security, stability and freeness.
I recently downloaded the latest offering of Debian which goes in the garb of Debian Etch Beta 3. Ironically, I came across the correct link through a comment inserted in a prominent news site (I will come back to it later). There are 19 ISO images to download if you want all the packages which runs to more than 17000 and their sources. But Debian also provides a net install CD image roughly around 140 MB size and is the preferred option for people who have a very fast Internet connection. And it is possible to install the distribution entirely via the net.
Since I was severely constrained in the Internet speed department, I decided to download the first CD image of size 643 MB praying that it would be enough to install a full fledged desktop environment. After a couple of hours, I had the ISO image successfully downloaded and burned on to the CD and I was ready to install Debian on my machine.
The main reason for trying out this version of Debian was to check out the new GUI installer which is considered to be a huge improvement over the previous versions. I booted my PC using the CD and I was shown a boot prompt. Here I had the choice of either installing using the text based installer or using the new graphical installer. Also it is possible to install the distribution using the expert mode or the normal mode. If you opt for the normal mode, the installer takes most of the decisions at the cost of your relinquishing fine grained control. Since I like having more control of the installation process, I opted for the expert GUI mode and diligently typed the command :
boot: expertguiIn fact, the installer provides a plethora of choices which one can learn about by navigating using the function keys F1 to F8 prior to entering the command.
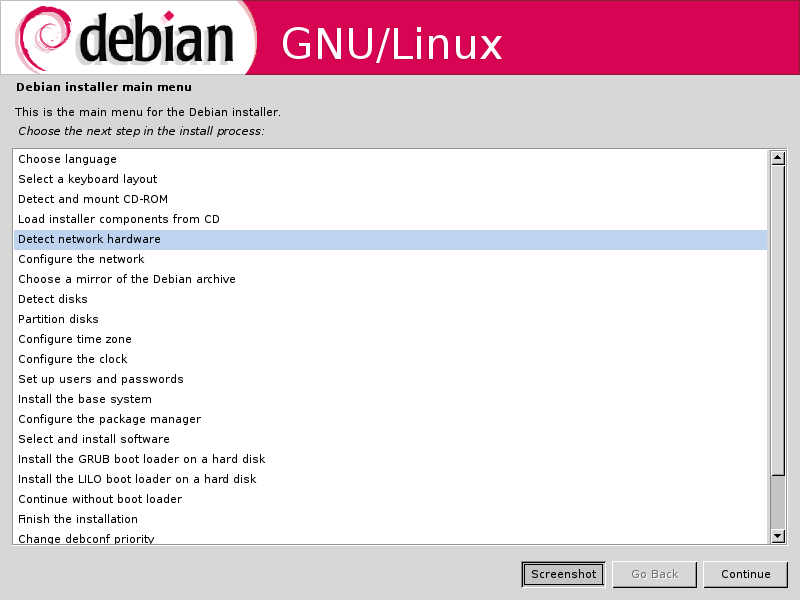 Fig: New GUI installer of Debian
In a short time, I was face to face with the new GUI installer which had a clean spartan look to it. The installer in itself has only three buttons. Them being "Continue", "Back" and "Screenshot". The "Screenshot" button will grab the current screen and save it as a PNG image in the /var/log/installer/ location which can be later accessed after the installation is complete. This imparts a nice touch to the whole process as it will, at a later time, aid in providing a visual walk-through of the installation steps to a first time user of Linux.
Debian Installation Walkthrough
The installation steps I had to go through are as follows :
- Choose language
- Choose a country or region
- Choose locale
- Select a keyboard layout
- Type of keyboard
- Keymap to use
- Detect & mount the CD-ROM
- Modules to load - like usb-storage, floppy and so on.
- Start PCMCIA ? Yes/No
- Modules to load - like usb-storage, floppy and so on.
- Load installer components from CD
- Detect network hardware - automatic detection
- Configure the network
- DHCP or static IP
- Set hostname
- Set domain name
- DHCP or static IP
- Choose a mirror of the Debian archive
- Choose the country
- Choose ftp location
- Enter any HTTP proxy information
- Detect disks - Automatic detection
- Partition Disks - Would be nice to have a help button here for first time users. For others the whole process is intuitive.
- Configure time zone
- Configure clock
- Setup users and passwords
- Enable shadow passwords? Yes/No
- Allow login as root ? Yes/No
- Set root password
- Create normal user account
- Install the base system
- Select the kernel image - There are 20 images including those with SMP support for 2.4 and 2.6 kernels.
- Select tools used to generate boot initrd
- Configure the package manager
- Should the network mirror be chosen ? Yes/No
- Use non-free software ? Yes/No - Really interesting!
- Select and install the software
- Participate in Debian popularity contest ? Yes/No - Cool!
- Select your choice of packages
- Desktop environment
- Web Server
- Print Server
- DNS Server
- File Server
- Mail Server
- SQL Server
- Laptop
- Standard System
- Participate in Debian popularity contest ? Yes/No - Cool!
- Configure Exim v4 - Mail Transport Agent
- Choose dictionaries to use (US, GB...)
- Install Grub/Lilo Boot loader or continue without boot loader
- Finish the installation
Even though there are a lot of steps involved in the Expert mode of installation (the number of steps are a lot less if you choose the normal mode), each of them are easy to understand. I found the installer to provide fine grained control over which modules to enable.
Usually most Linux distributions enable all the modules available even though many of them are not needed for the particular machine hardware. But Debian allows one to enable just those modules that are most suited for the machine. For example, my machine does not have infrared or wireless supported hardware so I can choose not to load the kernel modules related to these.
Another aspect which endeared me to the Debian way of installing Linux was the sheer number of kernel images available to choose from. The installer provided a choice of no less than 20 kernel images from the 2.4 kernel fit for installing on a 486 machine to the 2.6 kernel with SMP support for Pentium class of x86 machines.
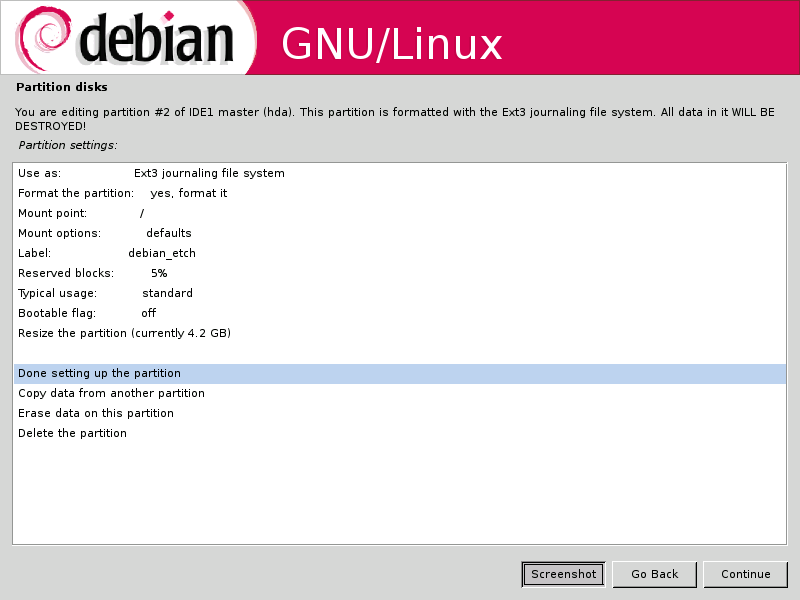 Fig: Partitioning the hard disk
The Grub boot loader also correctly detected the WindowsXP and Ubuntu 6.06 OSes residing on the other partitions on my machine though it failed to detect the FreeBSD OS. But then none of the other Linux distributions I have installed till now have correctly detected the FreeBSD OS while installing the boot loader.
If one has a net connection, I recommend choosing the standard system install (while installing the software) which will install a base system sans X server. And then it is only a matter of installing just those software which are needed using apt-get. I installed the standard system and then with an additional 150 MB download, I was able to setup a desktop system with an editor (GVim 7.0), a web browser (Firefox 1.5.0), a window manager Xfce 4.0 (a very good alternative to the more common heavy weights Gnome and KDE) and two graphics software Gimp 2.2 and Inkscape 0.44. It is clear that the Debian team have upgraded the Etch repositories to mirror the most recent versions of the software. For example, the Inkscape build was compiled as recently as July 2006.
And after all this, my Debian partition utilized only 1.1 GB space which includes the space used by apt-get for storing the packages downloaded for installing. I have started liking the Debian way of installing only what is necessary which does away with a lot of bloat. And I am sure this will be the preferred way of installing Linux in the future when majority of the people have access to high speed internet.
I found the new graphical installer similar to the text installer of FreeBSD in that it is possible to jump around back and forth in the different categories of the main menu. And once a particular task is finished, you are placed back in the main menu.
Bootup times of Debian
The boot-up times are significantly faster than any of the other Linux distributions I have used barring say Vector Linux or Gentoo which are also equally quick to boot up. I dare say I found Debian Etch to boot up quicker than Ubuntu :).
The Pros of Debian Etch beta 3
- Comes with an easy to navigate graphical installer
- Has a choice of 20 Linux kernels suitable for a wide variety of x86 machines.
- Gives fine grained control over the installation with options to enable/disable specific modules.
- Installs the latest versions of software. A real surprise!!
- Quick boot up times.
- Stable and secure - you get the same unadulterated operating system which powers many of the high traffic servers around the world.
- Support for setting up encrypted partitions during installation .
- Internet access is mandatory to install Debian unless you are willing to shell out money to buy a set of CDs.
- No out of the box support for Flash, Sun's Java, proprietary audio formats, closed source graphics drivers and so on. And these have to be included by the users themselves.
I had earlier noted that I got hold of the link to Debian Etch beta 3 from a prominent news site where a reader had graciously included it in his comment. Would I have succeeded in downloading the correct ISO (in my case the most recent one) if I had tried looking on the Debian website ? In all probability I would have ended up downloading the wrong version of Debian.
Agreed, Debian supports lots of architecture other than x86 and all these need to be given equal representation. But how much effort will it take to provide a download link to the latest version of Debian simultaneously recommending a specific version for desktop users (even if it is in beta stage) on the main page of debian.org site ? I would guess not much. The download link provided at present takes the visitor to Debian Sarge which is too outdated for use as a Desktop.
On this note, and with due respects, I feel Debian team seriously need to acquire some lessons in the ABC's of marketing. Just because it is a not-for-profit organisation doesn't mean that it has to refrain from marketing itself and rely exclusively on well wishers and enthusiasts to spread the word. It is high time that the Debian site is overhauled and made more user friendly (Read less cluttered) . For one, a new Linux user will not be able to make head or tail about Sarge, Etch or Sid. But if he is told which ISO image is most suited for a specific purpose, that will go a long way in making the end-user experience towards Debian much better.
I would love to see a forum hosted on the official site where users can post queries and help each other on Debian specific problems. If Debian has to regain the lost ground on the popularity front, then it has to take the desktop users (newbies ??) more seriously. While a system administrator is capable of taking care of problems he face with Debian himself, an ordinary user will need some directions. And Debian's capability in handling this section of users will decide how popular Debian gets in the coming future.
Having said all this, I eagerly await the final release of Debian Etch.
Kubuntu 6.06 LTS - An excellent Linux distribution based on KDE
July 26, 2006 7 comments At the time of the official release of Ubuntu Dapper Drake, I happened to visit the site of Kubuntu - the alter identity of Ubuntu. And on an impulse, I ordered a CD of the latest Kubuntu 6.06 LTS which was also released more or less at the same time as Ubuntu Dapper Drake but with a lot less fan fare. I forgot all about it till a couple of days back, when I received the single CD I ordered enclosed in a beautifully designed blue CD case.
This is one aspect of Ubuntu/Kubuntu I really like. They send you the CDs free of cost and they ship it to any place in the world and I believe this has helped in a large way in catapulting Ubuntu as the most popular Linux distribution.
 Fig: Kubuntu desktop featuring KDE 3.5.2
By the time I received the Kubuntu CD, I was very excited and raring to check out what Kubuntu had in store for the Linux users. I found that there is a great level of overlap between Kubuntu and Ubuntu in that the way it boots up is the same for both the distributions. And Kubuntu also uses the same installer bundled with the Ubuntu live CD which makes it possible to install Kubuntu in a mere six steps. More over, all the Kubuntu specific packages are in the same archives as that of Ubuntu.
The end result is that an Ubuntu user can install all the Kubuntu specific packages by running the following command:
$ sudo apt-get install kubuntu-desktopKubuntu 6.06 has KDE 3.5.2 which is the latest version of KDE and so comes with its own set of improvements. One of the most noteworthy is the system settings dialog. In the earlier versions of KDE, the system settings which includes configuring hardware, desktop and any other thing related to KDE had their own separate dialog which made it rather confusing to navigate. In the KDE that is bundled with Kubuntu, all the configuration settings can be accessed from a single location which is the system settings dialog - Windows users will find it similar to the Control Panel but much more intuitive.
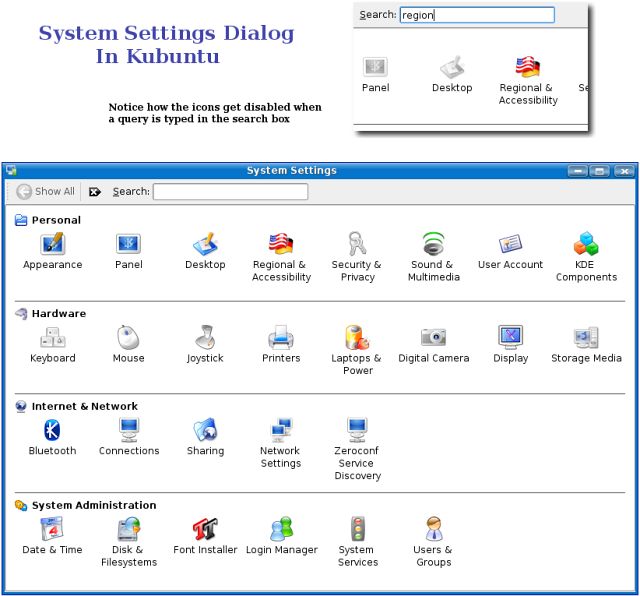 Fig: System settings dialog is much more intutive
Another thing which I found exciting was the inclusion of search as you type feature in each of the windows - be it the file manager or the system settings. And one has to just type the query string and the files matching the query will be selected in real time.
And to install additional programs, Kubuntu comes bundled with Adept - the installation manager similar to Synaptic found in Ubuntu. Here too, there is a search box and one has to just start typing and the results will be filtered as you type. I found this software to contain additional features such as tree view and advanced search with more options which made it a better option than synaptic.
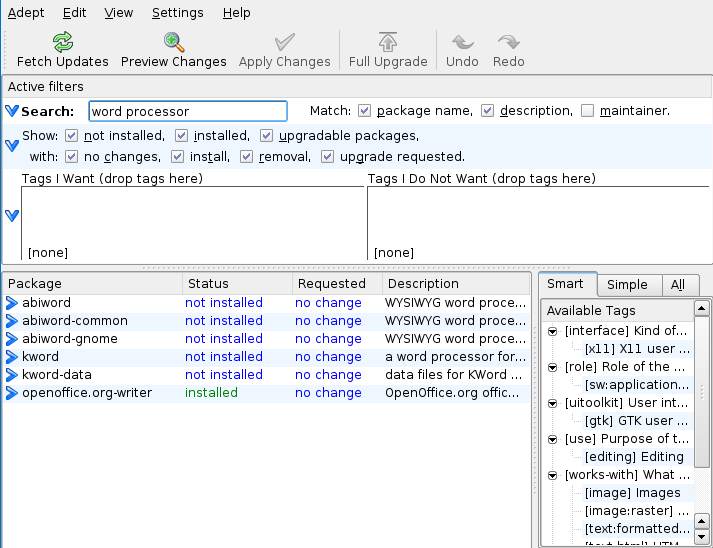 Fig: Adept package manager in Kubuntu
KIO Slaves
Of course, the one feature I really like in KDE and which is a prominent reason to use Kubuntu is the KIO slaves. What this translates for the end user is ease of use and lesser dependence on the shell. KIO slaves (KDE Input/Output Slaves) are programs that provide support for individual protocols. For example, I can view a man page, locate files on the system, ftp to a remote location, browse through any windows shares on my network, ssh to a remote machine and much more from within the file manager konquorer which by the way also acts as a web browser. Some of the useful KIO slaves which I found interesting are as follows:
- man:/command - This will show the man page of the command in Konquorer in a nicely formatted manner.
- locate:/query - Locate files which match the query and show it in Konquorer. Under the hood, the protocol uses the locate command.
- ftp://ftp.anothermachine.com - Will ftp to the remote machine and display the files in the location. If the username and password are required, it will ask for it.
- fonts:/system - See all the system fonts. But the users can also view the per user fonts by navigating to fonts:/user
- settings:/ - This will show all the system configuration links such as hardware configuration, display settings, desktop settings and so on.
- fish:/ - allows one to access another computer's files using the SEcure Shell protocol. The remote computer needs to be running SSH daemon.
Eg: fish://username@hostname[:portnumber]
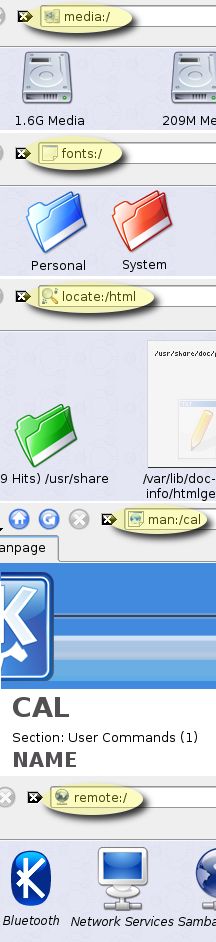 Fig: A subset of KIO Slaves put to use in Kubuntu
All the commands are to be entered in the address bar of Konquorer. But I found that some of them also work in file open dialogs or the run command box and so on in KDE. The above list is only a small subset of the entire KIO slaves supported in KDE. The last time I looked, KDE supports nearly 50 different KIO slaves which includes one for tar, gzip and bzip2 archives.
Kubuntu is no doubt a very polished distribution bundled with the latest version of KDE. Unfortunately, it has till now been overshadowed by its big brother Ubuntu to a large extent. But when KDE releases version 4.0 some time next year, I am sure it will gain more popularity than it now has and hence claim its rightful share in the lime light.
Operating System Reviews
June 08, 2006 0 comments
Which is the best Linux distribution ? How does one Linux distro rate against another ? These Linux OS reviews will help you make up your mind as to which is the best Linux OS for you. Many of these Linux distributions are liveCDs which can be tried out without installing on your machine. This page also feature a few other OS comparisons as well. For instance, Solaris, BSD, DOS and so on.
Clicking on any image will take you to the respective operating system review.
For web hosting comparison based on Linux, refer to the guide chart.
Happy reading.
Clicking on any image will take you to the respective operating system review.
For web hosting comparison based on Linux, refer to the guide chart.
Happy reading.
Vector Linux - A sleek, secure Linux distribution based on Slackware
May 09, 2006 18 commentsOver the years, I have installed and used quite a number of Linux distributions. But one distribution which I hadn't got the chance to install and use was the venerable Slackware. This was because I have encountered some difficulty in downloading this distribution from its official website - They actively encourage downloading the OS using a torrent rather than ftp. Anyway, recently I decided to download a relatively small Linux distribution going by the name Vector Linux. What piqued my interest in downloading this distribution was that it is based on Slackware. The version of Vector Linux I decided to try out was Vector Linux SOHO 5.1 which stands for Small Office Home Office. I downloaded the CD image and burned it into a CD. Then I booted using this CD.
 Fig: aterm - a lightweight X terminal which supports transparency
And after a short while, I came face to face with a curses based text based installer. Any body who has installed FreeBSD or Linux distributions like Debian, Slackware or even Ubuntu will feel right at home with this installer. I found it quite intuitive. Here I was faced with making choices. Like I could decide to partition my hard disk using fdisk, resize my existing partition to make space for a new one or just start the installation by selecting the respective menus.
I chose to start the installation as I already had a 3 GB empty partition on my machine. Here the work for me was cut out and I had to make simple choices like decide whether to have the home directory in a separate partition, setup the swap and root mount points, decide which filesystem to use like reiserfs, ext3, ext2 and so on. Next the installer prompted me to choose the integrated packages to install. Here there were no choices to make as the three packages namely base system which contains the kernel, the SOHO base system which contain the software as well as the system configuration package were mandatory.
I chose to start the installation as I already had a 3 GB empty partition on my machine. Here the work for me was cut out and I had to make simple choices like decide whether to have the home directory in a separate partition, setup the swap and root mount points, decide which filesystem to use like reiserfs, ext3, ext2 and so on. Next the installer prompted me to choose the integrated packages to install. Here there were no choices to make as the three packages namely base system which contains the kernel, the SOHO base system which contain the software as well as the system configuration package were mandatory.
The installer then prompted me to choose the optional packages which included drivers for printing, wireless networking drivers, sane scanner back-end, samba and so on. Since I did not have a use for any of these on my machine, I chose not to install these optional packages. After this the actual copying of files to the machine started and I had the option of taking a coffee break or read the names of all the people who contributed to this project scroll through in the upper portion of the screen.
The copying took about 10 minutes on my Pentium IV machine. Once the copying of the files was done, it offered to install the boot loader on my machine. Vector Linux ships with LILO boot loader and one has the option to install the boot loader in a variety of places such as in the master boot record, in a floppy, in the boot sector or decide not to install the boot loader at all. Since I had already installed other OSes and because of my affinity towards Grub, I decided not to install the LILO boot loader.
Next I was faced with the job of configuring the system which includes tasks like setting the time zone, basic hardware auto detection, setting up the network, sound setup, X windows and root password. Optionally one can also set up additional users. But what impressed me the most here was that it offered to probe the legacy ISA sound cards if any on my system. This is the first time that I have found a Linux installer offering to detect any ISA sound cards. All said and done, the installer detected all the interfaces on my machine and I had no problem in booting into Vector Linux.
Vector Linux comes bundled with two stock kernels one optimized for SATA/IDE hard disks and other for SCSI hard disks. And during the installation, one has to choose between the two.
Once the installation is over, one is booted into the KDE 3.4.2 desktop which is the default desktop in Vector Linux. Though it also has the latest version of XFce desktop which is a light weight complete desktop replacement for KDE.
Vector Linux is a well designed Linux distribution with a good collection of software most suited for a small office or home use. What I liked the most about this distribution was that it supported all the multimedia formats out of the box. To test this, I downloaded some video clips and music files in quick time, realplayer, wmv, mpeg and mp3 formats and tried playing each of them by double clicking them. And I was able to play all these formats in Kaffeine which is the default multimedia player in Vector Linux. What is more, it also has the libdvdcss library installed by default which allowed one to play encrypted DVDs.
Vector Linux comes with a choice of media players like Xine, the all powerful Mplayer and Kaffeine to name just a few. I was pleasantly surprised that the developers have integrated the mplayer plugin in Firefox web browser which enabled one to watch video clips inside the browser itself.
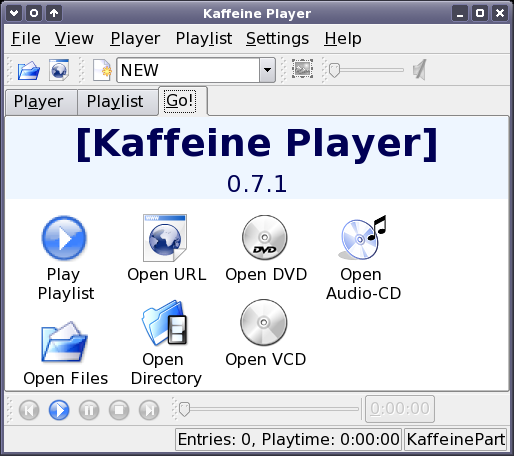 Fig: Kaffeine plays all audio and video file formats by default
 Fig: Xine playing a video clip
In Vector Linux, one has a robust easy to use administration front end in VASM. VASM - the Vector linux's Administration and System Menu - is a graphical front end which aids the user in doing all the system and network administration tasks with ease. VASM can be run in two modes - one the normal user mode where it helps the user in common system administration tasks pertaining to the user like changing his password or making his choice of window manager. And then there is the super user mode which allows one to do all the system administration tasks like managing users; changing the configuration details of the X server; setting up, enabling and disabling services running on the machine; networking and much more. In short, VASM is to Vector Linux what control panel is to Windows.
 Fig: VASM in action
As this distribution is built on the Slackware base, it brings with it all the positive aspects of Slackware which has ensured it a dedicated fan following. All the packages are in the tar.gz format.And you have the pkgtool which is the equivalent of aptitude in Debian. And it uses slapt-get - an apt-get equivalent for Slackware to download, install and uninstall software. There is also a front-end called Gslapt which has the same functions as Synaptic in Debian based distros. But Vector Linux has made its own improvements too. For example, the Firefox web browser bundled with it is the latest version 1.5 and interestingly, it is free from the memory hog problem faced by it on Ubuntu.
Another aspect which endears me to this secure Linux distribution is its speed.Vector Linux had a couple of extra services like ssh server and inetd server running by default when I installed it on my machine. But I was really impressed by the speed in which it booted to the desktop. It took just 35 seconds from cold start even with the extra services running where as other distributions took a little more than a minute on the same machine with no ssh and inetd services.
The developers of this Linux distribution have taken pains to see that it has all the software needed for running a small to medium business. It comes bundled with OpenOffice.org ver 2.0, Scribus 1.3.1 a desktop publishing software equivalent to Adobe Pagemaker and an accounting package called KMyMoney just to name a few. SAMBA has also been bundled with Vector Linux for people who want to connect to and transfer files to other Windows machines on their LAN. And for printing, you have CUPS - an interface which allows one to feed ones documents to the printer.
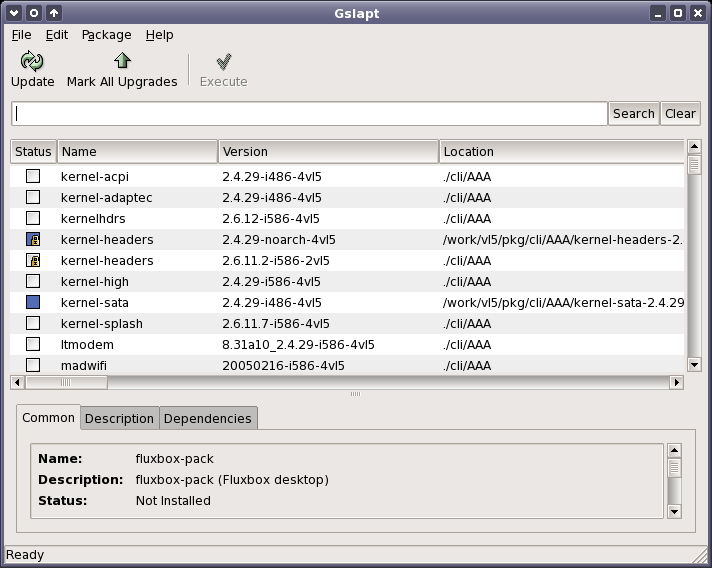 Fig: Gslapt - a Synaptic equivalent in Vector Linux
Advantages of Vector Linux
Put in a nutshell, these are the advantages a default installation of Vector Linux boasts of when compared to the default installation of main stream Linux distributions like Fedora, Debian and Slackware.
Put in a nutshell, these are the advantages a default installation of Vector Linux boasts of when compared to the default installation of main stream Linux distributions like Fedora, Debian and Slackware.
- Excellent Multimedia support - Plays any video or audio format one throws at it including encrypted DVDs.
- The latest version of Firefox ver 1.5 - And no memory hogging problems too. (Ubuntu developers please note ;) ).
- Sun's Java Runtime Environment ver 1.5 installed by default.
- Flash ver 7.0 plugin for Firefox installed.
- Optimized for speed - Boots up in much lesser time.
- Ideal for a small office setup with the right kind of software bundled with it.
The only drawback I found with Vector Linux was regarding its collection of software in its repository. The software collection for Vector Linux is nowhere near those of Ubuntu and Debian in terms of numbers. But the fact that one can install Slackware packages, somewhat gives relief to this issue. More over I feel the Vector Linux maintainers have taken judicious choices in selecting the software to be included in the repository as well as the base install of the distribution that anyone who is using it in an office setup will find everything they need, available in the repository.
End Note
All things considered, if one is on the lookout for a Linux distribution which is robust, fast, secure, able to play multimedia files without any configuration from the user's side, containing the latest versions of the software and good enough to be used in a small business setup then Vector Linux could fit the bill. Additionally if you are looking for a Slackware based distribution which covers all the above criteria, then Vector Linux is definitely the obvious choice.
All things considered, if one is on the lookout for a Linux distribution which is robust, fast, secure, able to play multimedia files without any configuration from the user's side, containing the latest versions of the software and good enough to be used in a small business setup then Vector Linux could fit the bill. Additionally if you are looking for a Slackware based distribution which covers all the above criteria, then Vector Linux is definitely the obvious choice.

