Damn! This is one small Linux Distribution

November 30, 2005 33 comments
My parents had inculcated some ideals in me when I was growing up and one of them was not to use swear words come what may. Which meant even if a guy was to come and box my snout, I would have said - "That was a despicable thing to do Old Fruit" or something on those lines. But things changed when I downloaded and tried a very cute distribution called DSL - short for Damn Small Linux (oops! I said it).

DSL was created by John Andrews whose main motive was to restrict the size of the resulting distribution but at the same time give a complete GUI environment which included all the softwares that a user might use on a day-to-day basis. He made sure that what ever softwares that are needed were included as long as the size of the resulting distribution could be restricted to just 50 MB. The result is what you see as Damn Small Linux.

Tiny Linux distributions are nothing new. In fact, the tiniest Linux distribution (Tomsrtbt) fits inside a floppy and has been around quite some time. But what is unique about DSL is that it is one of the first distribution which contains a GUI environment contained in its small size and targeted at the ordinary user. Also unlike its other counter parts, it is actively maintained by its creator.

DSL can be downloaded in three formats. They are as follows:
  • dsl-2.0RC2.iso - Which can be downloaded by all who have a fairly modern PC and who intend to use it as a Live distribution.
  • dsl-2.0RC2-syslinux.iso - This ISO image can be used by people who intend to run DSL in older machines.
  • dsl-2.0RC2-embedded.zip - This is the most unique in that it can be run from a windows environment. And is ideal if you want to install DSL in a USB key drive for instance.
I downloaded the embedded zip file and tried it in both Windows and Linux environment (See screen shots below). DSL uses Linux kernel 2.4.31 and according to the DSL team, they have opted out of using kernel 2.6 because of its bigger size and also their aim to support even very old hardwares which 2.6 doesn't.

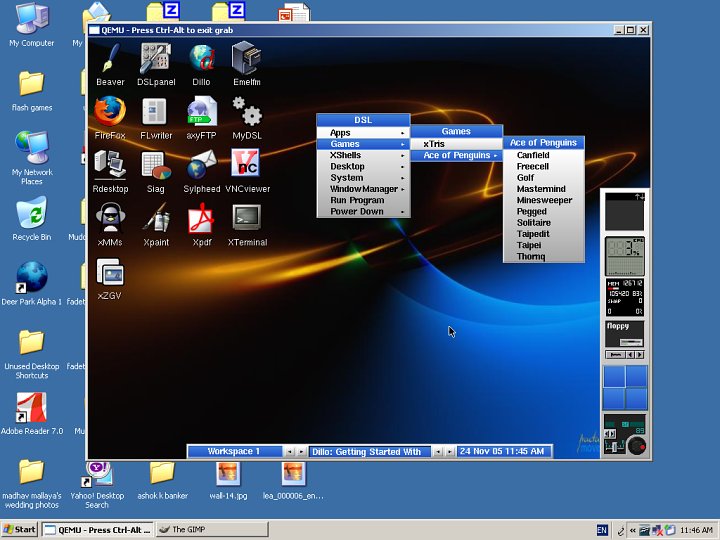
Fig: DSL running inside WindowsXP

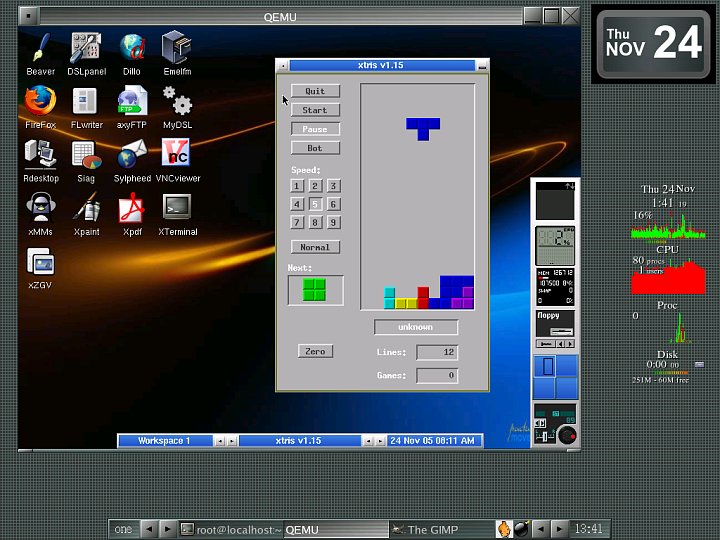
Fig: DSL running inside Fedora. A game of tetris in progress inside DSL

DSL harnesses the power of QEMU

DSL relies on QEMU to run on top of the host OS (whether it be Windows or Linux). QEMU is an open source cross-platform emulator for Linux hosts. It allows you to emulate a number of hardware architectures (x86, x86-64, and PowerPC are currently known to work, with others, including SPARC and MIPS, in development). QEMU thereby lets you run another operating system on top of your existing OS.

Useful Softwares bundled in DSL
  • Web browser - In fact 3 web browsers - Firefox 1.09, Dillo and Links.
  • Email Client - Sylpheed.
  • Spreadsheet - Siag.
  • Word processor - Believe it or not, DSL comes bundled with a word processor (FLWriter). It even has an MSWord Viewer to view your DOC files.
  • Multimedia - Xmms
  • Graphics suite
  • Games - Excellent collection of card games and a game of tetris.
  • PDF Viewer - XPDF
  • CD Burning Software - DSL has included CDW; a curses based CD burning software.
Window managers in DSL
DSL gives the user a choice of two window managers. By default it runs Fluxbox which is a light weight window manager. The other window manager being JWM. I have been using fluxbox as my window manager in Linux for quite some time. So I felt right at home the first time I tried DSL.

Stress given to user friendliness
Another aspect of DSL I found fascinating (especially considering its tiny size) was the stress given to usability. All aspects of configuration, which includes wireless network, mouse, keyboard, printer setup and most other services can be achieved via the DSL (Control) Panel.

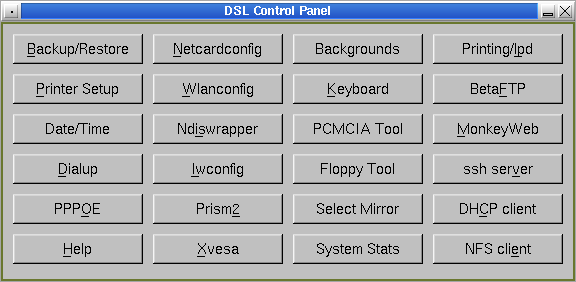
Fig: DSL Control Panel

There is something for system administrators too.

DSL comes with the following servers:
  • Web Server - Monkey Web server
  • SSH Server
  • FTP Server - BetaFTPd
  • NFS Server
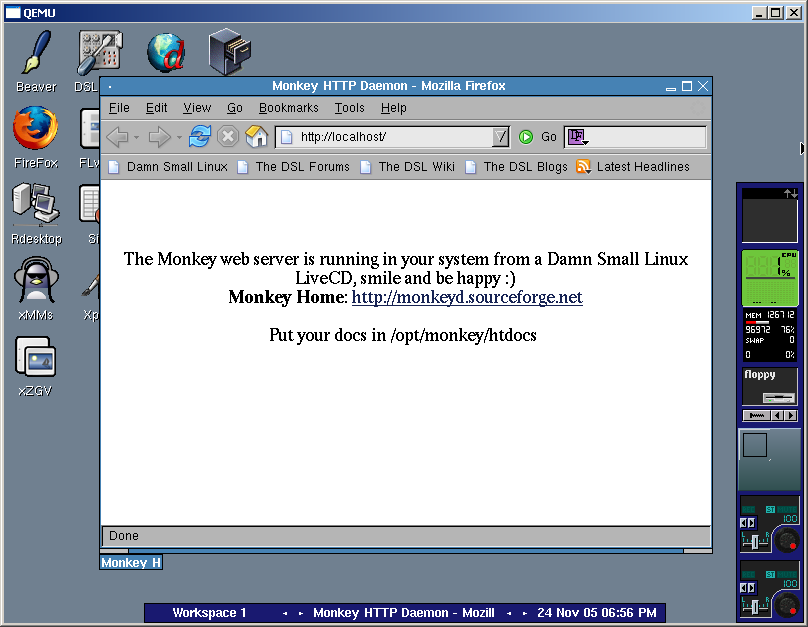
Fig: Screenshot of a HTML file hosted in Monkey Webserver in DSL

Uses of Damn Small Linux

By this time you might be wondering what is the use of this Damn thing (Pun intended). Right? Some of the uses I figured out for DSL are listed below:
  1. Suppose you are visiting a Cyber Cafe for checking your mail and you are concerned about your privacy. By using Damn Small Linux on a USB key drive, you can circumvent the problem because all the cookies, browsing history and passwords you use are stored in your USB key and not in the host computer.
  2. Your files will not be affected by viruses and worms that are residing in the host computer because you are using Linux on top of the resident OS.
  3. For a person more comfortable in working in Linux, DSL is god send because now he can work independent of the environment of the host computer.
  4. Where ever you may go, you can take a working OS with you and is saved from being at the mercy of the applications residing in the computers you are using.
If you put your mind to it, I am sure you can come up with even more uses for this cute little distro.

Damn! damn! damn! I can't stop taking the 'damn' word since I tried DSL (Sorry dad). This distribution truly showcases the power of the GPL which made the DSL project a reality. I shudder to think of what would have been the case if there was no GNU movement.
Update: Mr John Andrews the creator of DSL has clarified a point by posting a comment on this post which I have included here. I quote -
I just wanted to mention that DSL would not be half as fantastic as it is today without the tireless contributions from Robert Shingledecker. Everyone who enjoys DSL owes him thanks.

Time saving Linux desktop tips

0 comments
If you enjoy reading the views of others regarding a particular feature , or like to know tips and tricks which will help you to be more productive in Linux, then you should read "Time saving Linux desktop tips" - a post at ask.slashdot.org.

But in true slashdot tradition, it has an abundance of troll posts. So make sure you have ample time on your hands to sift through and seperate the chaff from the wheat (so to say).

JS/UIX - A Unix shell which runs in a web browser

November 28, 2005 1 comments
JS/UIX is a unix shell which can be run inside a web browser. The uniqueness of this project is that the whole shell has been coded entirely in javascript. It supports around 55 commands and even has a game called 'invaders' to amuse oneself during free time.

Fig: Preview of Unix shell running inside the web browser

Even though JS/UIX comes nowhere near a standard unix/linux shell, it helps a person to try out many shell commands when he has no immediate access to a linux or unix machine. Any web browser greater than Netscape 4+ and MS IE 4+ can run the shell without any problems provided you have enabled javascript.

How to Repair a Corrupt MBR and boot into Linux

November 25, 2005 0 comments
There are times when you inadvertently overwrite your Master Boot Record. The end result being that you are unable to boot into Linux. This is especially true when you are dual booting between windows and Linux OSes. Once when I was working in Windows XP, I accidentally clicked the hibernate button instead of shutdown. And windows somehow overwrote my MBR which housed the GRUB boot loader. At such times, it pays to have this cool tip at hand.

This is what you do to restore the GRUB boot loader when faced with the above problem. First you need a Linux distribution CD. If you are using Fedora (RedHat) then the first CD is sufficient. But you may also use any of the live CDs like Knoppix, Ubuntu Live CD and so on.

With Fedora CD
Boot your computer with the first CD of Fedora in your CD drive (You have to enable your PC to boot from the cdrom, which you can set in the BIOS settings). At the installation boot prompt that you get, enter the following command:
boot: linux rescue
... and press Enter. The installer will ask you a few questions like the language you would like to use, the type of keyboard etc. Then, if you have linux previously installed on your machine, the Fedora installer will automatically detect it and mount it in the /mnt/sysimage directory. Once the linux partition is mounted, you are dropped into the command shell prompt. The next step is to make your newly mounted directory the root (or parent) directory. This you do by running the chroot command as follows:
# chroot /mnt/sysimage
# _
Now you are in the shell with respect to the parent directory which is the linux partition on your harddisk.

From here, the steps needed depends on which bootloader you are using. You have to have a fair idea what is the device node of your harddisk partition housing your MBR. In most cases, it is /dev/hda if you have an IDE harddisk. But if you have a SCSI harddisk, it will be /dev/sda.

Restoring GRUB
Execute the following command :
# grub-install /dev/hda
... to install GRUB boot loader on to your MBR. And then type exit to reboot the machine. Now your GRUB boot loader is fixed.

Restoring LILO
LILO stands for LInux LOader which was the boot loader used before GRUB was developed. It is fairly cryptic and is the default bootloader prior to and in RedHat 7.0 .
Here you just type the command :
# /sbin/lilo
... to install the bootloader on to the MBR.

If you don't have a Fedora CD, then you need not despair. You can also repair the boot loader using one of the numerous live CDs available.

Using Knoppix CD to repair the boot loader
Here you have to boot into knoppix (either GUI mode or text mode). Once you are logged in, fire up a terminal (in GUI mode) and type the following commands:
$ su -
# fdisk -l
This will list your hard disk partition information. From the listing, you can know in which partition you have linux installed. Now you have to mount the partition which contains the linux filesystem. For the sake of this discussion, let us assume it is /dev/hda3 .
# mount -t ext3 -o rw /dev/hda3 /mnt
#_
Now your linux partition is mounted at /mnt . Next you have to use the chroot command as follows:
# chroot /mnt
#_
The rest of the steps are the same as listed above for Restoring GRUB and LILO boot loaders.

Update (August 01 2007) : Many have said when they run the grub-install command after following the above steps, they get an error saying that /dev/hda is missing. The most probable reason is that when you chroot to the mount location, it does not have a copy of the device nodes on your machine. Here is a solution for that. If you have installed Linux with /boot, /usr and / in different partitions then the above method may not get the desired results and running the grub-install /dev/hda command after running chroot might give the error that there is no /dev/hda. This is because you have mounted only one of the partitions which houses '/' . And the error tells you that it cannot find the device nodes. In this scenario you can do the following :

Lets say I have Linux installed with / in /dev/hda2, /boot in /dev/hda1 with an ext3 filesystem. I boot using a Live CD as described above and then mount the partitions as follows :
# mount  -t ext3  /dev/hda2  /mnt

# mount -t ext3 /dev/hda1 /mnt/boot
Remember that you are mounting the boot partition into the boot directory inside /mnt. Now mount the proc filesystem of your liveCD as follows (This is really an optional step):
# mount -t proc  none  /mnt/proc
Finally bind the device nodes build by your liveCD to the /mnt/dev location as follows :
# mount  -o bind /dev  /mnt/dev
Now you can chroot to the /mnt location and run the grub-install command as described above.
# chroot /mnt
# grub-install /dev/hda
Please note: This updated method is applicable only if you have a Linux installation spread across multiple partitions. If you have installed Linux in a single partition, the first and second step works flawlessly. At least it works for me.

Also Read :
Dual Booting Windows XP/2000 and Red Hat Fedora Core 2

Installing FreeBSD 6.0 - A Linux User's perspective

November 22, 2005 12 comments
I have been a Linux user way back from the first time I was introduced to an alternate OS than windows. Even though I was aware of other Unices like FreeBSD and Solaris, I hadn't come around to installing them on my machine. Two days back, things changed when I downloaded the latest FreeBSD version 6.0 from their official website. It consists of 2 ISO images of 565 MB and 666 MB.
I burned the images on to two CDs using K3B CD burning software and then started the installation.
FreeBSD comes with a text based installer which is quite intuitive. But a person installing a non-windows OS for the first time will initially find it a bit confusing.
  • Unlike the previous versions of FreeBSD, this installer does not give you an option to configure the kernel but straight away loads the main menu (called sysinstall menu), see figure below. Here I chose the standard installation menu which is the recommended option for first time users of FreeBSD. There is also a Custom and Express installation choice for more advanced users.
  • Now I was presented with the FDisk main screen which prompted me to create partitions. I created one partition from the available free space and FreeBSD gave it the filesystem number 165 because FreeBSD uses the Unix FileSystem (UFS) where as in Linux it is ext3 (83).
    Note: For those who are uncomfortable using fdisk, there is a wizard mode which is enabled by pressing '' while in FDisk main screen, where you get some hand holding.
    One thing I found really interesting was the naming of the hard disks. I have a Seagate 40 GB IDE hard disk. It was recognized as /dev/ad0s where as in Linux it is recognized as /dev/hda .
  • Next screen gave the option to install the FreeBSD boot manager. I chose to install a boot manager because I wanted to boot between multiple OSes.
  • Next the installer prompts you to create the mount points. Here I chose the auto option by pressing 'A' and FreeBSD created mount points automatically. This was how FreeBSD created the mount points on my machine.
    Part       Mount    Size     Newfs    Part
    ad0s3a / 512MB UFS2 Y
    ad0s3b swap 166MB SWAP
    ad0s3d /var 1107MB UFS2+S Y
    ad0s3e /tmp 512MB UFS2+S Y
    ad0s3f /usr 3292MB UFS2+S Y
    I found this unique because in linux, it is up to the user to decide to allocate space for swap and other partitions. Where as here, I created one single partition from the available space for the OS and FreeBSD further divided this space optimally for swap and other mount points.
  • After the successful creation of mount points, I was prompted to choose the type of installation. Like in Linux, here too you can select from a Developer, X-Developer, Kern-Developer, X-Kern-Developer, Minimal, User, X-User or Custom choices. I selected the 'User' choice which installs all the tools except X server and GUI tools. I felt this was desirable choice because it is easy to install more packages via the FreeBSD ports later.
  • Next the installer asked which installer medium I wanted to use. As FreeBSD is a network operating system, it gave me multiple choices like installing from a CD/DVD, NFS, Floppy, via FTP and so on.
    After it accepted my choice, it started copying all the files which included documentation and man pages to the FreeBSD partition which took about 10-15 minutes.

Fig: sysinstall Main Menu

Finally, It asked me a series of questions and made some changes to the configuration files according to my preferences. The questions asked were as follows:
  1. Would you like to configure any ethernet or SLIP/PPP network devices ?
  2. Do you want this machine to function as a network gateway?
  3. Do you want to configure inetd and the network services that it provides ?
  4. Would you like to enable the SSH login ?
  5. Do you want to have anonymous FTP access to this machine ?
  6. Do you want to configure this machine as a NFS server ?
  7. Do you want to configure this machine as a NFS client ?
  8. Would you like to customize your system console setting ?
  9. Would you like to set this machine's time zone now ?
  10. Would you like to enable Linux binary compatibility ?
  11. Does this system have a PS/2, serial or Bus mouse ?
For all the above questions all I had to do was give a Yes or No answer. And accordingly suitable action was taken by the FreeBSD installer.
  • In the next step, I was given the choice of fine tuning which packages I want installed on my machine. Here I chose the default selection.
  • Lastly I was prompted to create an ordinary user account and also set the password for the root account.
That is it. Now I was free to reboot into the newly installed FreeBSD.

Characteristics of FreeBSD
1) A robust OS with its own set of command line tools similar to (but not same as) those found in Linux. This I realized when I executed the command :
# fdisk -l
In FreeBSD, it gave me a short help on the options to be used with fdisk command. Where as in Linux, it lists the partition table. In fact all the command line tools in FreeBSD have been inherited from the BSD port and only their names are similar to their counterparts in Linux.
2) FreeBSD boots into C Shell by default. Though you can also switch to the bash shell.
3) Has a wide collection of applications (Over 8000 packages) in its ports system which is equivalent to the Yum/Apt-Get in Linux and installation of new applications is a snap with automatic resolution of dependencies.
4) Installs a very secure OS by default.
5) The file system used is the Unix File System (UFS2) which supports additional features not supported in Ext2(3) filesystems.
6) Will run applications compiled on Linux platform if the Linux compatibility package is installed.

Initial drawbacks for FreeBSD converts
1) Even though I found the FreeBSD installer rather intuitive, a first time user might find it a bit unfriendly when compared to the installers of RedHat or SuSe.
2) Users migrating from Linux will encounter a slight learning curve as they will have to learn some new commands and unlearn a few others. Also the file hierarchy is different than in Linux.
3) If your system has ISA cards, then there is a fair chance that you might encounter some trouble in installing FreeBSD 6.0 basically because you do not have the option of configuring the kernel during install time when you can enable ISA support - which I think is disabled by default. I was able to install FreeBSD 6.0 on one of my PCs which had an Aztec2320 chipset based ISA sound card. But each time I booted into FreeBSD, the system hung for close to 30 minutes during booting, after which it booted up normally. I didn't encounter this problem when I installed on a newer Pentium 4.0 machine which didn't have any ISA slots.

Step-by-step guide to Structured Wiring

November 20, 2005 1 comments

In my opinion, one thing that most system/network administrators are shielded from is the actual physical laying of the network which includes tasks like cabling, crimping and so on. But it doesn't hurt to acquire this knowledge right ? Who knows, in the near future, if you decide to wire your home to make it network ready, you can cut costs if you know how to do it yourself.

Bob Catanzarite has written a nice step-by-step guide on Structured Wiring where he explains how he wired his house and made it network ready. The guide is extensively peppered with photos. Bob touches on important topics right from the planning stage to tools used, designing the layout, to coax stripping and finally wireless networks. All said, a very informative site.

Get exact control over your files and directories using ACLs in Linux

November 19, 2005 0 comments
If you are a windows user then you must be aware of the fine grained control over who can read, write and execute files residing in NTFS file system. And Unices like FreeBSD and Solaris has had it since a long time. On the other hand, Linux by default, has basic control of read, write and execute access rights for files and directories. But if you are using Linux kernel 2.6, you can also have fine-grained control over files and directories residing on ext2/3, XFS, JFS and ReiserFS file systems by enabling ACLs. ACL stands for Access Control Lists and is enabled by appending the word 'acl' in the relevant section of your /etc/fstab file. For example, if I have my home directory residing on a separate ext3 partition, then I can enable acls as follows for the /home partition:
# FILE: /etc/fstab
...
LABEL=/home /home ext3 defaults,acl 0 2
...
Note the word 'acl' appended to the above line of code. Now one has to let the kernel know about the change and so have to remount the /home partition. This can be done by using the mount command:
# mount -o remount /home
Now I can start assigning per-user rights to each and every file on the /home partition using the getfacl and setfacl command.
For example, I have three users on my system saj, jake and leander. And I have a file called tester.txt in my home directory (/home/ravi), which I want to share with these three users. User saj should have only read-only access where as jake and leander should have both read and write access to the file (/home/ravi/tester.txt). To achieve this, I will use the setfacl command as follows:
$ setfacl -m u:saj:r--,u:leander,jake:rw- tester.txt
The above command can be read as follows: Modify (-m) the access control list on the file tester.txt by giving read-only access (r--) to user (u) saj and read-write access (rw-) to the users (u) leander and jake.

Conversely, you can create a group by a name say 'mygroup' and add the users leander and jake to mygroup and set the acl for the file as follows:
$ setfacl -m g:mygroup:rw- /home/ravi/tester.txt
getfacl command on the other hand, is used to view the access-control rights for a particular directory or file.
$ getfacl /home/ravi/tester.txt
# file: tester.txt
# owner: ravi
# group: ravi
user::rw-
user:jake:rw-
user:leander:rw-
user:saj:r--
group::rw-
mask::rw-
other::r--
And if you want to remove acl rights to a file for a particular user, you use the setfacl command with the -x option as follows:
$ setfacl -x u:saj,u:leander /home/ravi/tester.txt
You can also completely remove the acl from a particular file or directory by using the --remove-all option:
$ setfacl --remove-all /home/ravi/tester.txt 
One another thing, if you check the long listing of the file for which an acl has been set, you can find a plus (+) appended to the rights portion of the listing.
$ ls -l tester.txt
-rw-rw-r--+ 1 ravi ravi 0 Nov 18 18:53 tester.txt
This is verily the tip of the iceberg so to say, of implementing access control lists on Linux. In fact, Van Emery has written an in depth article on Access Control Lists called Using ACLs with Fedora Core 2, which gives new insights in using access control lists to one's advantage in Linux.

The Complete Concise History of GNU/Linux

November 17, 2005 39 comments
There are reams and reams written about the history of Linux umpteen times by many. So why another post on the history of Linux? I felt that I wouldn't be doing justice if this site dedicated to Linux didn't have atleast one post telling how Linux evolved from a project started by a university student to the robust OS it is now. But as the title indicates, I have kept it really short so that any one can come up-to-date by just glancing through it. To actually know the whole history, you have to go all the way back to 1971.
  • In June 1971, Richard Matthew Stallman joined MIT Artificial Intelligence Laboratory as a programmer where he gained popularity with the hacker community and came to be known by his now popular name RMS. At that time, all the programmers used to share their code freely among each other cutting across various institutions.

Fig: Richard Mathew Stallman - The Father of GNU Movement
  • In 1980, with the advent of portable software - ie software that can be compiled to run on different computers, a business model emerged where in, the companies developing the code refused to share the code with their clients and began restricting copying and redistribution of their software by copyrighting it.
  • In response to this trend, Stallman, who believed in the principle that software has to be free always, founded the Free Software Foundation and in 1985, published the GNU Manifesto. This manifesto outlined his motivation for creating a free OS called GNU, which would be compatible with Unix. By the way, GNU is a recursive acronym for GNU is Not Unix. He along with a group of like minded programmers started work in developing the tools needed to make a complete OS - like an editor (Emacs), a C compiler (GCC), libraries and all associated generic Unix tools like cat,ls, chmod etc.
  • In the same year (1985), a professor by name Andy Tanenbaum wrote a Unix like Operating system from scratch based on System V standards POSIX and IEEE for the Intel i386 platform. He named it Minix.
Fig: Prof. Andy Tanenbaum - Creator of Minix OS
  • In 1989, Stallman released the first program independent GNU General Public Licence now popularly known as GPL or copyleft. Not only that, he published all his work under this licence. Now the only thing that GNU lacked was a completely free OS kernel. Even though work was going on in developing HURD which was to fill that gap, the progress was slow.
  • In 1990, A finnish student by name Linus Torvalds studying in the University of Helsinki came into contact with Andy Tanenbaum's OS, Minix. Linus wanted to upgrade Minix by putting in more features and improvements. But he was prohibited by Tanenbaum to do so. Then Linus decided to write his own kernel and released it under GPL. This kernel is now popularly known as Linux.
Fig: Linus Torvalds - Father of Linux
  • After 1997, a programming model other than the GPLed model emerged which is now popularly known as the Open Source Initiative. Bruce Perens is credited for creating the Open Source definition - the manifesto of the Open Source movement in software. Eric.S.Raymond another hacker became one of the prominent voice in this movement. But he is more known for his very popular essay "The Cathedral and the Bazaar" which has since been published as a hard cover book by O'Reilly.
Fig: Bruce Perens - Cofounder of Open Source Initiative

Fig: Eric S Raymond

Fig: Alan Cox - Has made major contributions in coding the Linux Kernel.

Fig: Jon Maddog Hall - Another leader of the Open Source movement.

Popular Linus Speak
  • If you want to travel around the world and be invited to speak at a lot of different places, just write a Unix operating system.
  • An infinite number of monkeys typing into GNU emacs would never make a good program.
  • Making Linux GPL'd was definitely the best thing I ever did.
  • Really, I'm not out to destroy Microsoft. That will just be a completely unintentional side effect. (NewYork Times Interview)
Popular Richard Stallman Speak
  • When you are talking about Linux as a OS, you should refer to it as GNU/Linux. Linux is just the kernel. All the tools that make Linux an OS has been contributed by GNU movement and hence the name GNU/Linux.
  • I could have made money this way, and perhaps amused myself writing code. But I knew that at the end of my career, I would look back on years of building walls to divide people, and feel I had spent my life making the world a worse place. (On why he decided against writing propritery software).
  • Fighting patents one by one will never eliminate the danger of software patents, any more than swatting mosquitoes will eliminate malaria. (While talking on how to fight software patents - singly and together).
  • If anything deserves a reward, it is social contribution. Creativity can be a social contribution, but only in so far as society is free to use the results.
  • If you want to accomplish something in the world, idealism is not enough--you need to choose a method that works to achieve the goal. In other words, you need to be "pragmatic."
  • We don't think of the Open Source movement as an enemy. The enemy is proprietary software.
  • I consider that the golden rule requires that if I like a program I must share it with other people who like it.
  • People sometimes ask me if it is a sin in the Church of Emacs to use vi. Using a free version of vi is not a sin; it is a penance. So happy hacking.
  • Value your freedom or you will lose it, teaches history. 'Don't bother us with politics', respond those who don't want to learn.
Popular Raymond speak
  • Given enough eyeballs, all bugs are shallow.
Popular Tanenbaum speak
  • LINUX is obsolete (In a Usenet message in 1992)
  • Be thankful you are not my student. You would not get a high grade for such a design. Writing a new OS only for the 386 in 1991 gets you your second 'F' for this term. (To Linus Torvalds).
  • Microkernels are not a pipe dream. They represent proven technology.
  • While most people can talk rationally about kernel design and portability, the issue of free-ness is 100% emotional.
Little known facts about Linus Torvalds
  • Linus wanted to name his OS Freax instead of Linux.
  • Linus is known as the 'Benevolent dictator for life' of Linux kernel.
  • Linus's parents were both left wing campus radicals. His father was a communist who spent a year studying in Moscow.
You and Me - We all form a part of the Linux history.
As you can see from the figure above, the ordinary users of Linux form the base of the Linux pyramid. If the user base disappears, the whole pyramid crumbles. So if you are a linux user, then you can boast to your kids, grandkids and great grandkids (if you are still alive ;) ) about the role you played in shaping the history of this wonderful OS.

Integrating Mac, Linux and Windows machines in a network with centralized login

November 16, 2005 2 comments
You work for a large corporation which contains 100s of computers running a variety of OSes from Linux to OSX to Windows. And all these machines have to communicate with each other as well as be used by multiple users. In this situation, it would be desirable if you could enable centralized login. Nate Osbone has written a cool article which details how to set up such a network using centrally managed user accounts . Linux machines run Samba server to connect and share files with its windows counterparts. A very well written, informative article with lots of pictures.

How To Set File Attributes In Linux Using Chattr Command

November 13, 2005 25 comments
Chattr is a command used to set / unset file attributes in Linux. Using chattr it is possible to make a file immutable. That is, even a root user will be prohibited from deleting the file.

The trick lies in setting the appropriate attribute for the file.

chattr command is similar to the attrib command in DOS but much more powerful and flexible.

How to Add a Swap File in Linux

November 09, 2005 1 comments
Manually creating a Swap file in Linux is easy and can be accomplished by a few steps as shown below.

1. Create a swap file of the desired size


We use the dd command to create and copy the file we will be using as the swap file.

As an example, lets create a swap file of 1 GB size -

# dd if=/dev/zero of=/my-swap-file bs=1024 count=1024000

The options passed to the dd command are as follows -

if=/dev/zero - Says to read from /dev/zero instead of stdin.

of=/my-swap-file - Asks the command to write the output to the file /my-swap-file.

bs=1024 -  Block size, read and write up to 1024 bytes at a time. The optimum block size is hardware dependent but 512 to 1024 is a fair value to use.

count=1024000 - Copy only 1024000 input blocks;  [1024 * 1000 MB]

2. Set the correct permission for the swap file


# chown 600 /my-swap-file

Make the permissions read and write for owner and no permissions for group and others. For security reasons, it is prudent to restrict access to the swap file to people with adminstrative powers - usually root.

3. Prepare the swap file


For this you use the mkswap command.

# mkswap /my-swap-file

4. Activate the swap file


Use the swapon command to activate the swap file so the system can start using it.

# swapon /my-swap-file

Finally, if you want the swap file to be available across reboots, you need to append the following line to the /etc/fstab file.

/my-swap-file  swap  swap  defaults  0  0

The above line tells Linux to mount the swap file during boot time.

Save and close the /etc/fstab file.


Script - Record Terminal Session

November 06, 2005 0 comments
Script is a command line tool in Linux that allows you to record anything that scrolls through your terminal.

Suppose you are compiling a program and all the error messages, scroll off your screen without giving you time to read.

The script command will come to your aid. Using script it is possible to collect all the error messages scrolling through your screen for later use.

Differences between various Unix flavors

November 04, 2005 0 comments
If you look at the history of Unix, you will find that it is strewn with different flavors of Unices, each doing a particular task in its own way, there being no synergy between them. Inspite of all this, some of the Unix flavors have succeeded in surviving the Linux onslaught.
As a Linux user, have you ever wondered what differences each Unix flavour have from each other ? Yes? Then look no further. Bhami.com has compiled an extensive table detailing the differences in commands used for executing a task in various flavors of Unices and Linux which I found really interesting. It is a real eye opener for anyone interested in computing on the Posix platform.

Gimp - The graphics suite par excellence on Linux

November 03, 2005 10 comments
Gimp is a GPLed cross platform graphics suite which rivals many commercial graphics packages available in the market. I have been using Gimp for all my graphics needs for the past two years. And believe me, this is a winner not only in terms of price (which it is) but also in quality and features. You can do everything and almost anything using Gimp that you can achieve in Adobe's Photoshop. All the screenshots and images used on this site have been created or modified using Gimp.

Fig: Main interface of Gimp

Gimp is an ideal tool for optimizing the images meant to be hosted on the web. The most endearing aspect of Gimp for me is the plethora of scripts and plugins that are installed with it. Gimp uses a scripting language called Script-fu which can be used to create beautiful banners and buttons meant for use on websites.
You should not mistake a script with a plugin. A plugin requires a image to work on, where as a script will create an image from scratch. There are over a hundred plugins and script-fu's available for gimp. Want to create a ripple effect on your image? No problem! you can create it with the click of a button. The area where Gimp outshines Photoshop is in creating images optimized for the web.
As a first time user, you will find the user interface of Gimp a bit clumsy because each function has its own window unlike Photoshop which has a single main window which encloses all the features. But after working in gimp for some time, you will realize that it is really a great advantage to have multiple independent windows. Let me elaborate on what I just said. Usually, you will be doing graphics manipulation using a monitor having atleast 1024x768 or higher resolution. In this resolution, you can neatly arrange the multiple windows in gimp in such a way that they don't overlap each other (See Fig below). This makes working in gimp easier and enjoyable. Gimp is available for multiple platforms (Windows, Linux, Unices ).

Fig: Gimp windows arranged for efficient use.

Fig: You get a good set of brushes in Gimp

Some of the powerful features in Gimp are as follows:
  1. Support for creation of Layers, Channels and Paths.
  2. Excellent collection of plugins and scripts (Script-Fu)
  3. Creating Alfa channels and Layer Masks.
  4. Good set of tools equivalent to those found in Photoshop like crop tool, gradient tool, Magic wand, Clone tool, paint brush and so on which will make a Photoshop user feel right at home.
  5. Save images in over 34 formats including in Photoshop file formats, not to mention TIFF, GIF, JPEG, PNG and Postscript.
  6. Gimp maintains a history of your actions which helps you to go back to any previous point if you have made a mistake.
  7. Can easily automate a function by writing your own scripts to do a particular task using script-fu.
Shortcomings of Gimp
  • One of the biggest short comings of Gimp is lack of good CMYK support.
    For those in the dark, CMYK (Cyan, Magenta, Yellow and Black) refers to the color of inks used in the printing process. So if you are readying a graphics (maybe a brochure) to be send to your neighborhood commercial printers, then you have to convert it to CMYK mode before sending it to them. CMYK support is very important for any graphics package to make it big in this profession. And Photoshop is where it is because it has better CMYK support. But that is bound to change as Gimp developers have promised better CMYK support in the next major release of Gimp.

Fig: Gimp has an Inbuilt Unit Editor

Fig: A well designed 'preferences' dialog

Fig: Create special effects on images with ease

Bottom Line
  • Home users need not look at any other software when Gimp is around. You get all the power that you need - be it photo retouching, red-eye removal, creating borders for your photos and more - in Gimp.
  • If you are a web developer creating images to be used on a website or to be viewed on a PC, you will be working in RGB (Red,Green,Blue) mode. I strongly recommend using Gimp as your graphics software.
  • But if you create graphics meant for printing, then it is better you stick to Photoshop for the time being because of poor support for CMYK mode in Gimp.

Mount Command in Linux

November 01, 2005 1 comments
This article explains the use of mount command in Linux.